Did you know that the BBC Microbit is the smallest programmable computer in the world? What’s more, it’s also the first computer designed specifically for education. Even better, learning to code on it is easy and fun!
The Microbit is an ideal entry point into both software and hardware development and is in synchronization with kids coding. It comes with a range of interactive features that make it simple to learn about input, outputs, timers, and digital vs analog inputs.
Learning how to use Microbit opens up a new world of digital electronics and coding. Feeling excited about this new world!! You can also learn to use Microbit through our microbit courses.
In this blog, we will explore some of the key aspects of learning electronics with Microbit so that you can get started straight away.

If your child is curious about how everyday gadgets really work, a Microbit is a wonderful place to begin. At SkoolOfCode, kids tinker with LEDs, batteries, sensors, and simple circuits in small online classes that turn that curiosity into hands-on learning.
Why should you learn to code with Microbit?
There are many reasons why you should learn to code with Microbit. Coding is a skill that is in high demand and it is also a lot of fun!
There are many reasons to learn coding with Microbit.
- It’s a great way to get started with coding if you have no previous experience.
- Microbit is very versatile and can be used for a wide range of projects.
- Microbit can be integrated with different subjects. For more information on how math can be integrated with Microbit.
- They are relatively inexpensive, making them an ideal platform for experimentation.
- With Microbit, you can code in blocks or text. This implies Microbit provides a low floor of entry and a higher ceiling. For beginners, block-based is preferred. More information about block-based coding.
- Microbit is portable, so you can take it with you anywhere.
- It has a built-in LED display, so you can see your code running in real time.
Why Students should learn Electronics?
Electronics is such an important aspect of our lives – it underpins almost everything we do. From the phone in our pocket to the car we drive, electronic components and circuitry are everywhere.
A career in electronics offers many opportunities – from developing the latest smartphone to working on life-saving medical equipment. Electronics engineers can work in any number of industries, including automotive, aerospace, retail, and telecommunications.
Electronics is an important aspect of many students’ future careers. Electronics is the basis of modern technology and being able to understand how it works can give students a significant advantage in their future studies and employment prospects. Electronics is also an enjoyable and rewarding hobby in its own right, providing students with a creative outlet and the opportunity to learn new skills. Students can advance their electronic concepts with Robotics for kids courses.
Why learn Electronics with Microbit?
Electronics is the study of electrical circuits. It is a branch of physics that deals with the flow of electrons in solids, liquids, and gases. Electronics are used in a wide range of applications, from computers and cell phones to automobiles and aircraft. Learning Electronics with Microbit is a great way to get started in this field. With Microbit, you can experiment with a variety of electronic components and learn how they work. Microbit is also affordable, so it is a great way to get started in Electronics.
Coding + Electronics with Microbit
Microbit is a microcontroller that has been designed to make STEM learning concepts easier for children. Learning Electronics is so much fun with Microbit. Microbit kit (Microbit and some electronic components) provides a great platform to learn Electronics from scratch. Electronics is a topic that most schools do not have enough time to teach in-depth, but students need it for future careers. Electronics is actually the basis of modern technology. Creating your own Electronics is extremely beneficial because you learn Electronics from a deeper level and can see how it is applied in real life. This provides students with an understanding of how Electronics works when using it in everyday life.
Saanvi at SkoolofCode dived into the field of Electronics through her Microbit traffic lights project. This is one of our maker projects. Our students are having fun learning and making various projects.
In this blog, we will learn about some electronic components and learn to make circuits with them. We will also code the Microbit to control the electronic components.

Want your child to try a project like this with a live instructor guiding them? Our small-group Microbit classes walk kids through real circuits, LED projects, and sensor-based builds at a pace that suits them. You can see our Microbit and electronics tracks and pick one that fits your child.
How does Microbit work?
Microbit has a built-in processor that runs your code. It also has a built-in LED display, so you can see your code running in real time. Microbit is powered by a battery or USB.
Some of the key features of Microbit include:
– A built-in LED display
– Built-in buttons
– Motion detection
– Magnetometer sensor
– Temperature sensor
– Light sensor
– Sound sensor
– Touch-sensitive logo
– Bluetooth
– USB port
– Battery port
What are some things you can do with Microbit?
There are many things you can do with Microbit. You can use Microbit to make electronic projects such as step counter, stopwatches, traffic lights, etc. You can also use it to code games and make music. Microbit is also great for teaching coding and Electronics in the classroom.
DIY Traffic Lights
Scientists have been inventing technologies to make our lives easier for ages. If you go back in time and see what people used to live without before certain gadgets or devices were invented, it would seem like magic! One such device is an Electronic Traffic Light which was invented after years of research for improved traffic management at crossings and junctions. Nowadays all kinds of advanced designs exist even though their core functionality remains the same.
Materials Required for the Traffic lights
- Microbit with USB cable and battery
- Light Emitting Diodes (Red, yellow, and green)
- Alligator Cables
- Cardboard
- Foil paper
- Stapler with pins
Before we start, let us understand some basic Electronics concepts
Basic Electronic components and terminology
What are Digital and Analog signals?
At some point or the other, we come across electrical signals. Some of those examples include light from lamps and LEDs, sound from speakers, etc. Electronic components pass on these signals as electricity. Digital means those signals which can exist in only two states (i.e. either 0 or 1) for eg. the light is either ON or OFF.
Analog refers to those which can take any value between a particular range. This implies it can have more than 2 values or we can say n number of values. For eg., the speed of the fan can be represented by an analog signal as we mostly have 4 or 5 levels of speed. The intensity of light emitted by an LED is an analog signal as it varies in the range of 0 to 255.
Key Parts of Electronics Circuit
Every Electronics circuit has three fundamental parts:
Voltage Source (which provides the required voltage to drive the circuit), Current (which passes through the closed loop), and load (which can be a bulb or LEDs, or a motor).
When electricity passes through any component in a particular way, it gets either amplified or reduced by that component. Let’s explore circuits through a simple circuit shown below.
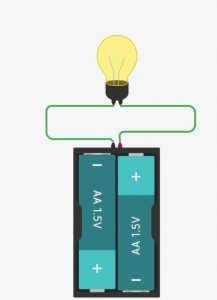
Let’s understand circuits with a simple example of a torch.
The input or voltage source in this case is a battery. The output (load) is the light from the torch bulb. Current is basically the flow of charged particles from the battery to the bulb and then back to the battery forming a closed loop. The electronics circuit provides the complete path to allow current to flow in a circuit. A detailed explanation of the basic concepts of electricity such as voltage, current, and resistance can be checked in the instructable.
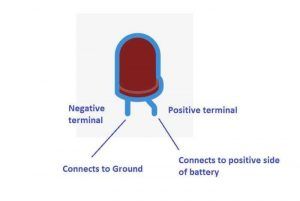
What is a Light-emitting Diode (LED) ?
LEDs are Electronics components that emit light when you pass an electric current through them. LEDs have polarity; hence, you need to connect the positive and negative pins of the LED as shown below.
Now that we have understood some Electronics concepts, let’s explore how we can make a Microbit traffic light.
Let’s start making the circuit
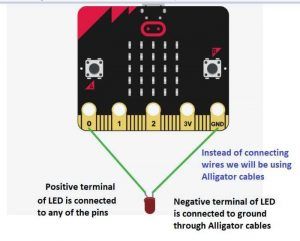
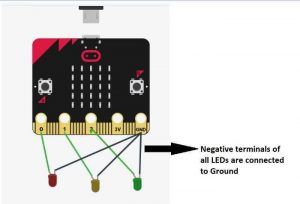
Before making the circuit let’s learn how to connect a Light Emitting Diode (LED) to Microbit. The positive terminal of the LED can be connected to any positive pin (P0, P1, or P2) and the negative pin is connected to the ground as shown in the circuit below.
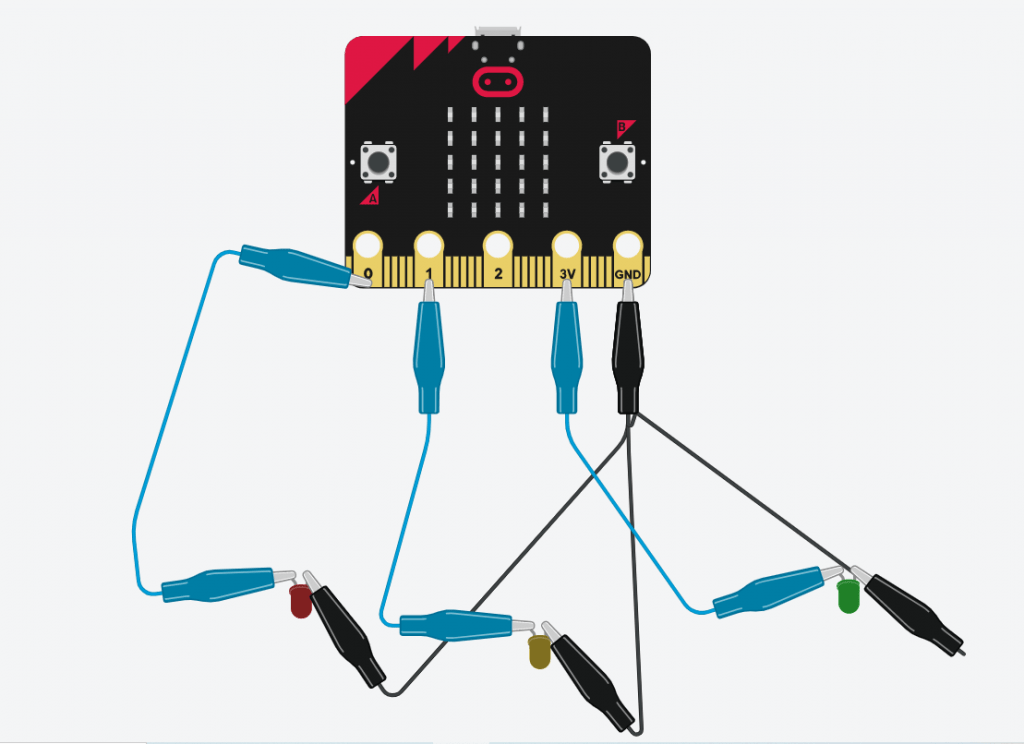
Now for traffic lights, we require 3 LEDs Red, yellow and green. For this, we can use the three pins of the Microbit (Pin0, Pin 1, and Pin2). Also, we need to connect the negative terminal of all 3 LEDs with the Ground terminal of Microbit. So, to make the ground common for all the LEDs we will be using foil paper pasted on the cardboard/ hard paper as shown.
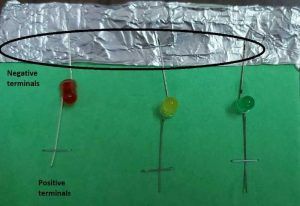
We are using foil because foil as it is conductive. The first step is to cover one end of the small piece of cardboard with foil as shown in the picture below.

The next step is to connect the negative terminal of the LED to the foil. The terminals can be stapled on the foil as shown.
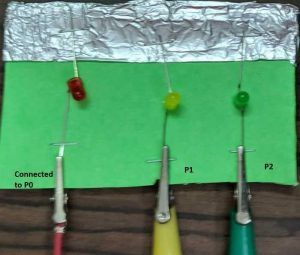
After this, the LED-positive terminals can be stapled to stay firm. Further, the alligator clips can be connected to Microbit pins through alligator cables as shown.
Coding is required in order for the microcontroller to turn on or off each LED segment according to what state it should be in.
Let’s start Coding now
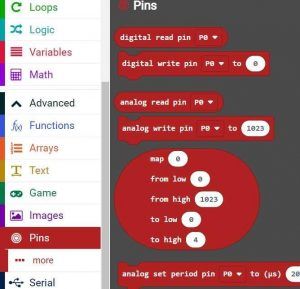
Microbit can be coded through Makecode which can be accessed at https://makecode.microbit.org. Let’s start by opening the new project name “Traffic Lights”. We will be using the digital write block to turn ON the specific LED. The digital Write block can be accessed from the Pin section as shown in the picture.
Let’s begin with defining three functions red, yellow, and green to generate Red, yellow and green colors. The functions block can be accessed through the Functions section in Makecode.
What are Functions ?
Functions are blocks of code that can be executed when they are called.
For this project, we need to write 3 functions: one for red color, one for yellow, and one for green. The function block needs two inputs: the name of the function (red, yellow, or green) and the time duration for which it has to run in milliseconds.
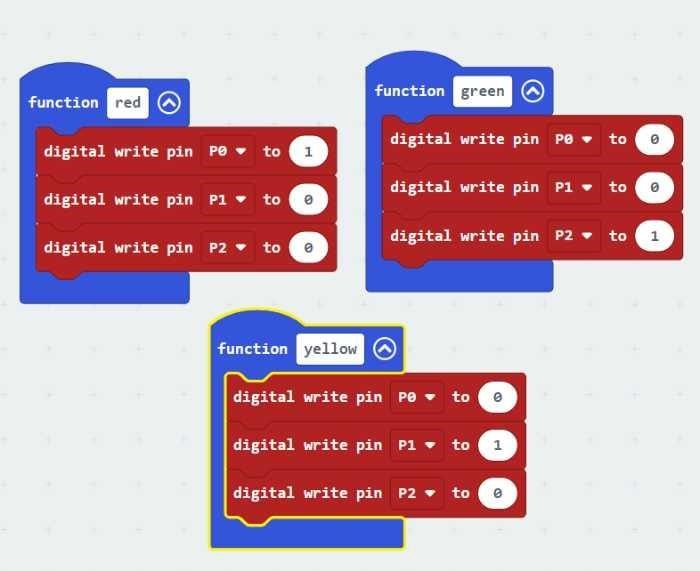
The function Red will turn ON the Red LED and turn OFF the yellow and green LED.
Code Explanation for function Red: –
1) The First block sets pin 0 high which turns on RED LED since it’s connected to the Positive terminal of the Red LED. This is done by digital write (pin0, HIGH)
2) The Second block and the third block turns off Yellow and Green LEDs respectively.
Similarly, the yellow function will turn ON the yellow LED and so do Green. After creating functions it’s time to call them in the main program. So, we will use a forever loop to turn ON the light in sequence. The main code is shown in the picture below:
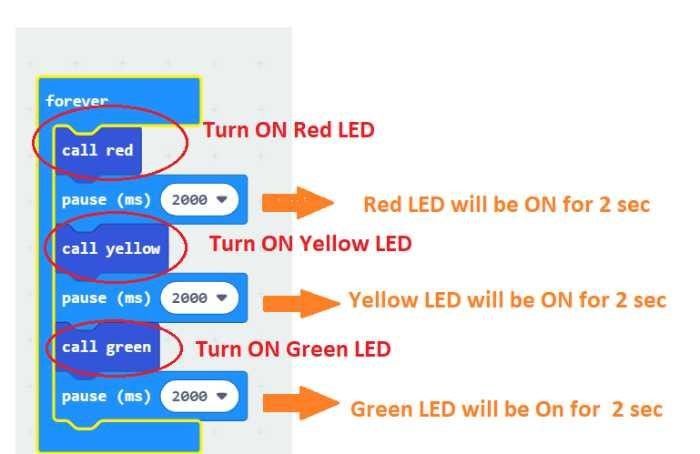
The pause block will provide the delay required in turning ON the lights. As the code is in a forever block the traffic light sequence will keep on repeating.
This is the simplest form that the project could take and it still has potential for interesting modifications if one wishes to explore them!
Time to download the code and test the traffic lights in action!!
Connect the Microbit to your laptop/Desktop through a MicroUSB cable. Click the Download button in the Makecode Editor. Go to the folder where your code is and copy that file. Open the Microbit drive and paste the file. More details regarding the download process can be accessed in the blog.
Once the program has been loaded successfully, you will be able to see the Red LED lit up on your Microbit which shows that it has started executing the code. After uploading makes sure you disconnect the USB cable before powering it again using the battery as it can damage your microcontroller if connected while powered.
Let’s use our new traffic light now!!
Our students are having fun blinking the traffic lights in different sequences and patterns. You can also learn through our Microbit courses which will keep you up to date with technology.
Conclusion
This project is a great way to learn Electronics and Coding. You can explore more by adding features like a pedestrian crossing, changing the duration of each light, etc.
I hope you enjoyed this project. If you want to explore electronics and coding you can enroll in coding classes for kids.
Happy Learning!!:)
Ready to see your child build their own circuit? Book a free trial class at SkoolOfCode and let them code a Microbit project (LEDs, traffic lights, or a simple sensor build) with a live instructor in a small online group.
By – Dr. Kadam Bhambari , an Educator at SkoolofCode with Ph.D. and MTech in Electronics. She is an expert in Microbit, Arduino, and Artificial intelligence.