Microbit is a pocket-sized computer that you can code, customize and control to bring your digital ideas, apps, and games to life. Microbit is used in the computer science curriculum in schools all around the world. Microbit is a great way to teach coding concepts to beginners in a fun and interactive way. With Microbit, students can see their code come to life in front of their eyes, which helps them understand the concepts better. Plus, they can take their creations home with them and show them off to their friends and family! You can use Microbit for all sorts of cool creations, from robots to musical instruments – the only limit is your imagination! In this blog, we will learn how to make a stopwatch with Microbit.
Building little Microbit projects like this stopwatch is one of the ways kids at SkoolOfCode pick up real coding and hardware skills together, one button press at a time.
What is a Stopwatch ?
Stopwatches are a great way to time yourself or others. They can be used for races, timing how long it takes to complete a task, or just for fun! Stopwatches usually have two buttons – one to start the timer and one to stop it. Stopwatches can be digital or analog. Analog stopwatches have a second hand that rotates around the clock face. Digital stopwatches display the time in numbers on an LCD screen. Stopwatches can be simple or complex, but they all work on the same basic principle – they keep track of time!
There are many ways to code a stopwatch with Microbit. In this blog, we will learn how to code a basic stopwatch with two buttons – one to start the timer and one to stop it. Stopwatches can be bought from most stores, but why not make your own? It’s easy to do with Microbit. All you need is a Microbit and a few AAA batteries.
If your child likes hands-on builds like this, our Microbit and coding classes at SkoolOfCode walk small groups of kids through projects (stopwatches, step counters, mini games) with a live instructor, so they can ask questions while they build.
Let’s start making a Stopwatch
Before we start, let’s take a look at the Microbit buttons and LEDs. The Microbit has two buttons, A and B. These can be used to control your programs. The Microbit also has an LED display. The Microbit also has 25 LEDs arranged in a 5×5 grid. These can be used to display messages or patterns. This is how the Microbit will show you information

In the Microbit Stopwatch when you press Button A the stopwatch is activated and after that when you press Button B the Microbit calculates the time between Button A and Button B pressed and displays it on the Microbit.
To get started with Microbit, you’ll need to use a code editor. There are different platforms available for coding for kids but for Microbit we recommend Microsoft MakeCode.
Microsoft MakeCode is a free and open-source drag-and-drop blocks programming language that can be used to program Microbit. It also supports JavaScript for advanced users. To start coding with Microbit, go to https://makecode.microbit.org/. This will take you to the Microsoft MakeCode website where you can start coding your very own Stopwatch! On the Microsoft Makecode website, there are two options for coding, Blocks, and JavaScript. For this project, we will be using the Blocks option.
Once you’ve got the editor open, you’re ready to start coding! The Blocks editor has all of the code blocks you need to create your Stopwatch program laid out in an easy-to-use interface. To get started, click on the “Blocks” button in the top right corner
- Open a new project and name it Stopwatch.
- On Button A pressed we need to start the timer of the Microbit. For this, we will be using the block “running time”.

3. This block captures how long the Microbit is switched On in milliseconds. Also, we will make a variable called start which will store the value of elapsed time since the Microbit (can be virtual also) started. So. let’s create a variable start and initialize it to running time.

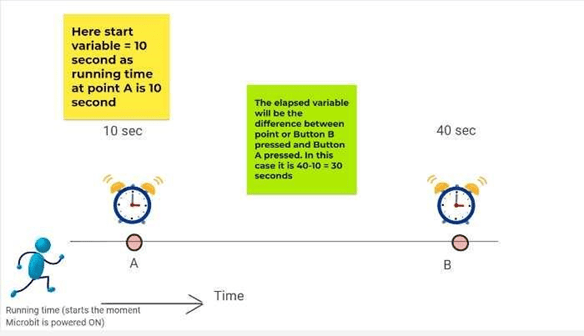
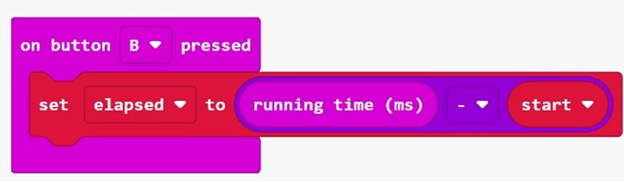
4.Add an event to run code when Button B is pressed. Also, we will add a code to calculate the difference between running time and start time. This difference is the elapsed time ( this is stored in a new variable called elapsed) since button A is pressed. The calculation of elapsed time is explained with values in the picture below.
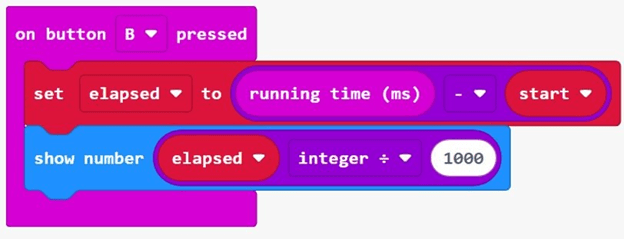
5. The stopwatch should display the number of milliseconds elapsed. To see the elapsed time in seconds we will use the integer divide block from the Math’s category. the elapsed time is divided by 1000 to convert it into seconds
The code is complete. You can test the code in the simulator or download it by clicking on the download button. More detailed information regarding how to download the code on Microbit can be accessed in the blog.
Time to have fun
Now it’s time to have fun with your Microbit stopwatch. You can use the Microbit stopwatch in different games of your choice and have fun with technology. This is how you can code a Stopwatch with Microbit. Our students are already having fun using this project.
You can also learn Microbit at SkoolofCode and create cool projects with our Microbit courses. So, why wait and Book a FREE trial class today.
Thank you for reading this blog. We hope you enjoyed learning how to code a stopwatch with Microbit. Stay tuned for more exciting blogs and coding tutorials coming your way.
By – Dr. Kadam Bhambari , an Educator at SkoolofCode with Ph.D. and MTech in Electronics. She is an expert in Microbit, Arduino, and Artificial intelligence.