Microbit is a small, codable computer that lets you get creative with digital technology. You can use Microbit to create all kinds of things, from robots to musical instruments and games. Microbit is used in computer science curriculum across different parts of the world. Math is a fundamental subject that helps children understand the world around them and their place in it. Microbit can help make Math more engaging and enjoyable for children. It can also be used to support Math learning in the classroom.
Microbit online coding classes can give children the opportunity to use Math in a creative and practical way. It can help them to understand Math concepts in a more concrete way and see how Math is used in the real world.
How can Microbit be used to support Math learning in the classroom?
Math is all around us, and Microbit is the perfect way to bring Math to life. With Microbit, you can create mathematical models and simulations, as well as code algorithms to solve problems. There are several ways that Microbit coding classes can be used to support Math learning. Some of them are summarized below:
- Makes Math more engaging and enjoyable for children.
- Helps children to understand Math concepts in a more concrete way. For example, it can be used to create simple multiplication machines. This can help them to understand how multiplication works and see it in action.
- Aids in the visualization of Math in the real world. Microbit can be used to create graphical representations of Math concepts such as data handling and probability. This can help them to understand these concepts more visually.
- Provide an opportunity for children to use Math in a creative and practical way. Microbit can be used to create simple multiplication machines. This can help them to understand how multiplication works and see it in action.
- Allows children to use Math creatively and practically. For example, Children can convert the Microbit into a gadget to track their steps and calculate distances traveled.
The possibilities are endless! So, get coding and have fun with Math and Microbit.
In this blog, we’ll show you how to use Microbit to create a simple multiplication machine. This is a great way to learn about how algorithms work and to see the potential of Math in action.
To get started, you will need:
– 1 x Microbit
– 1 x AAA Battery Pack
– 1 x USB Cable
Multiplication Revision machine
A Microbit Math revision machine is a simple multiplication game in which the player must correctly answer as many Math problems as possible. The game can be adapted to suit different age groups and abilities.
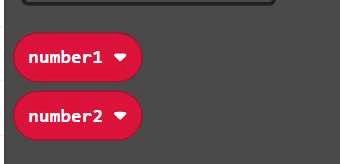
When Button A is pressed the Microbit will give a random multiplication problem. The students can think of the answer in their minds. When Button B is pressed the Microbit will show the solution which the students can verify.
Programming Multiplication machine
Makecode provides tools to code Microbit. For this, we can download the Makecode App or access the editor online. Create a new project and name it a Multiplication revision machine. For multiplication, we require two numbers. The numbers need to be selected randomly and most of the time the numbers will change. Hence, we need two variables to store the value of numbers.

What are variables in programming?
Variables are containers for data. Variables can be used to store numbers, characters, or strings. It is also good practice to give them meaningful names so that they are easily identifiable. First, we need to declare the variable. Next, we need to give a value to the variable.
Let’s gain more clarity on this with an example. Suppose in a game, we can declare a score as a variable. The value of the score will keep on changing as the player plays. However, we will always declare the variable first and then initialize it to 0 (because when the game starts the score is always 0). More details about variables can be accessed in the document.
Let’s apply this understanding of variables in our program
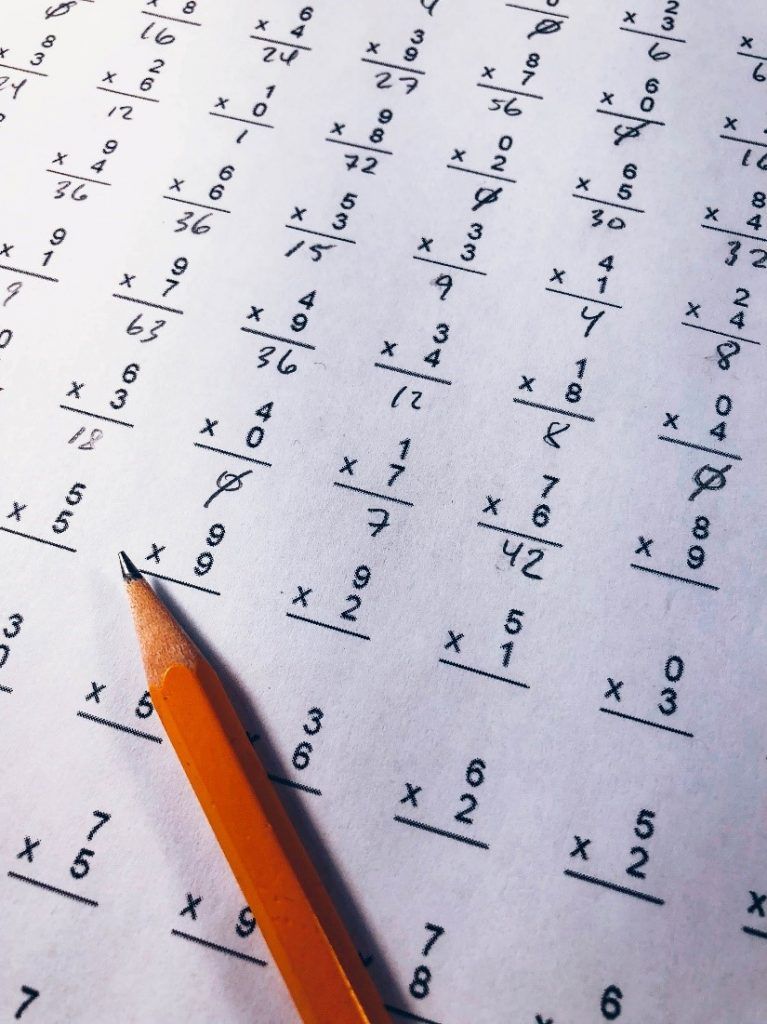
In the Math multiplication problem, many combinations can be used as input values such as 2 * 3 or 5 * 9. So, we will create two variables to store the value of the two input numbers.
Let’s Start Coding
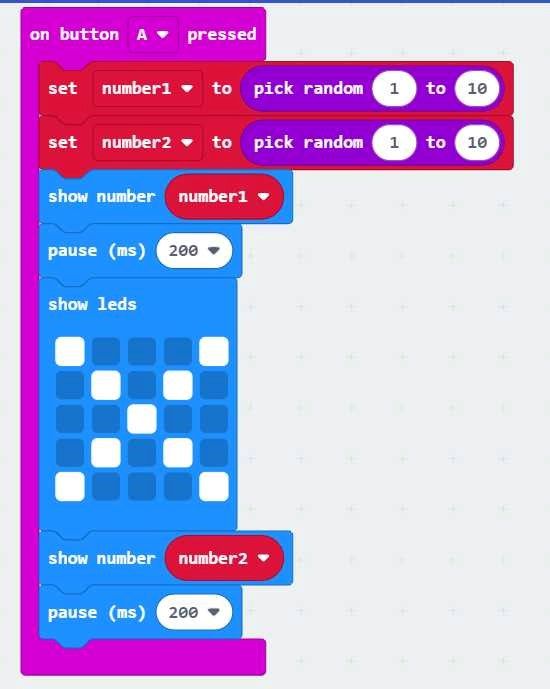
We want that when we press Button A on Microbit, it should show a random multiplication problem. Also, when we press button B it should provide an answer to that problem. So, we will take two event handlers
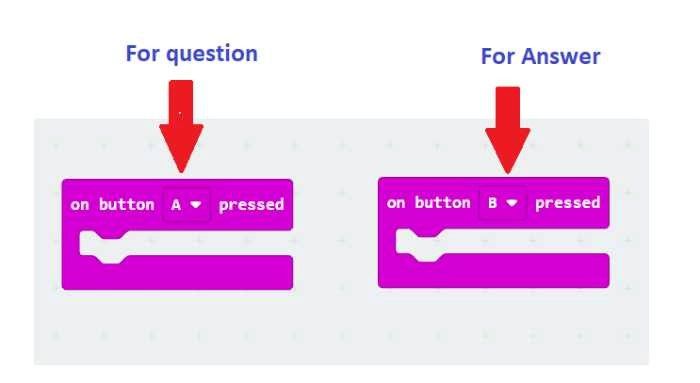
Random multiplication should appear when we press Button A. Hence, we require two numbers that should be selected randomly for the multiplication problem. It would be a good idea to align this project with the Math school curriculum. So, this multiplication machine should give us random multiplication problems starting from 1 to 10 (Variables will be used). Therefore, we will initialize the two variables and use the pick random block to give it a range of 1 to 10. The pick random block helps to get a random number within the range of 1 to 10 (or the specified one).
The next step is to show the multiplication problem on the screen. For this, we will use the show number block to display variables’ number1 and number2. Also, a pause block will be used to vary the amount of delay.

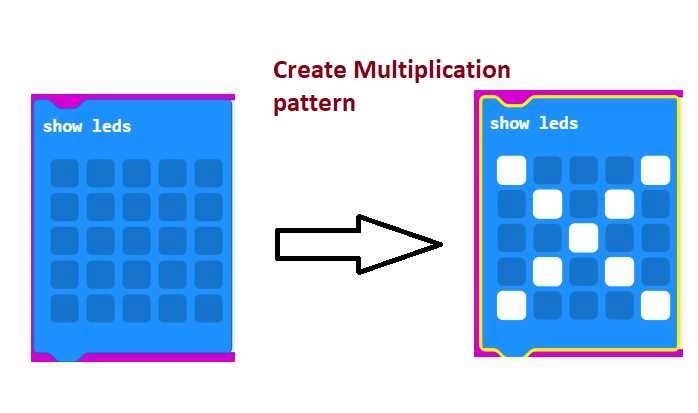
The next step is to show the multiplication operator also between the numbers. So, we will use the show LEDs block to create a multiplication sign as shown in the picture below.
Now on Button A pressed we will get a random multiplication problem. The code for the same is shown below.
Now whenever button B is pressed, it should show (the solution of a simple multiplication problem). We want that the answer (calculation) of the multiplication problem should be shown on screen. For this, we need to find out the product of the multiplication problem (variable number1 and variable number2). So, we will use Math block for multiplication as shown below.

Download the Code
It’s the turn now to test the code. We can use the Makecode simulator to test the code. The other option is to download the code on the Microbit. The detailed process of downloading the code on Microbit can be accessed in the blog.
After the coding and testing, it’s time to revise our multiplication tables with our friend Microbit.
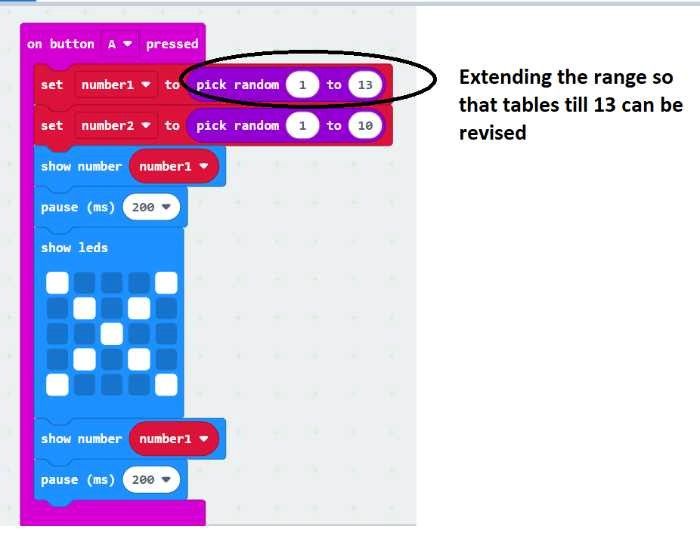
Extending the code (Challenge)
This was a simple project but it helped us in the Revision of Math multiplication tables while having fun with coding. However, in school let’s say we are learning multiplication tables till 13. So, we need to customize the code so that we can revise tables till 13. For this, we need to extend the range in pick random block as shown in the picture.
Conclusion
In this blog, we have learned how to make a simple multiplication machine with Microbit. The programming concepts like variables and operators have been used in this project. We hope you enjoyed doing this project. If you want to learn Microbit and make interesting projects then you can join coding classes for kids at SkoolofCode. At SkoolOfCode, we offer project-based learning modules where students use live code to find logical and inventive solutions to problems. So, why wait and Book a FREE trial class today Our students are having fun and learning the STEM concepts in our Microbit online classes. That’s it for this blog. See you soon with another interesting blog. Thank you!
By – Dr. Kadam Bhambari , an Educator at SkoolofCode with Ph.D. and MTech in Electronics. She is an expert in Microbit, Arduino, and Artificial intelligence.