
Aarna is a student at SkoolOfCode. Coding is fun for her as she is able to build fun projects like Fortune teller with Microbit. She started her coding journey with Microbit. Microbit is a minicomputer through which you can interact with the real world. Microbit is a microcontroller (minicomputer) and has a lot of sensors (accelerometer, light sensor, temperature sensor, etc.) onboard which promotes learning STEM concepts along with programming concepts. The best part about Microbit is that you can try a lot of projects even if you don’t have a Microbit. You can code in Blocks, JavaScript or Python.
The idea of the Fortune teller project
Aarna gets an idea of creating a random answer generator (Fortune teller) while interacting with Microbit sensors which she uses to create games.
Aarna used an accelerometer sensor to implement her idea i.e. Fortune teller game. Let Aarna take you on the journey of her game through which she can have fun while getting random answers from her Microbit. The game consists of the following steps:
The user will ask questions from the Microbit which have the answer yes, no maybe. More answers can be added such as definitely not, Hmmm. and absolutely. The questions can be anything such as “Will it rains today?”, “Will I get a pet?” etc.
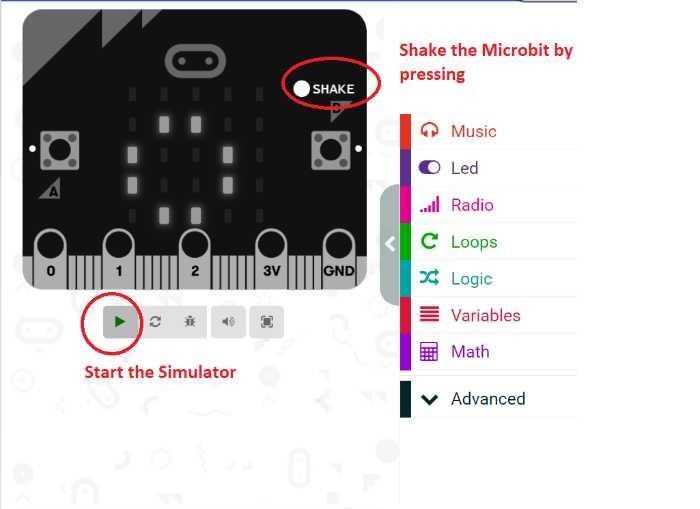
The user will shake the Microbit to get an answer.
The Microbit will select a random answer and display it on the Microbit screen. The Microbit screen is a grid consisting of a 5×5 LED (Light-emitting diodes) matrix whose size is 10*10.
The user can shake the Microbit again to get another answer.

The sensor used for game
For this fortune teller game, the Microbit makes use of an accelerometer sensor. An accelerometer sensor refers to the device which measures acceleration forces. This helps to differentiate between various orientation changes that occur when you move an object around or otherwise change its orientation with respect to gravity. For example, a microbit can detect when you shake it, tilt left, and tilt right, move it in x, y and z-direction.
Coding Platform (Makecode)
For coding the Microbit the Makecode software is used. The Makecode software is Block-based i.e. you have to drag and drop blocks in the workspace area. The blocks need to be stacked together, similar as we stack our Lego bricks. Drag & Drop (block-based) block coding is more beginner-friendly as it has predefined blocks for us to use for different projects. The Microbit simulator can be accessed at www.makecode.microbit.org.
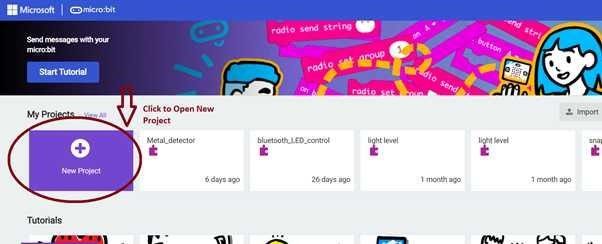
Makecode is the online Coding editor provided by microbit. Let’s start making the fortune teller project. Open the site makecode site (www.makecode.microbit.org ). The Makecode platform is block as well as text compatible. When you click on the Makecode site you will see the following display (as shown in the picture). To open a new project click on the New Project as highlighted in the picture.
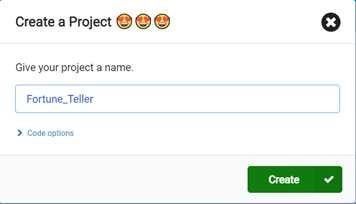
After clicking on the New project a pop-up window will open. Give your project a name and click on Create.
When we click on Create the Makecode interface will open. Let’s have a look at Makecode Interface. There are different sections
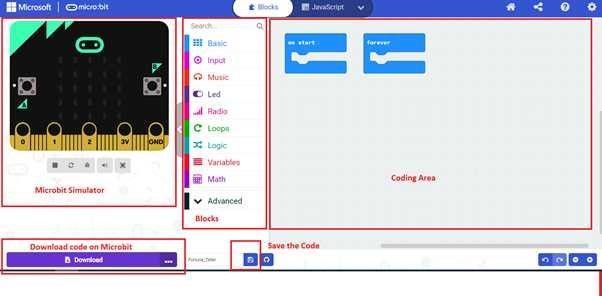
Coding Area: In this area, you can drop the blocks and stack them together to make the final code.
Blocks: These are different categories through which we can select specific blocks. For example
Microbit Simulator: This is the area where we can view the response of the Microbit to the Code.
At the bottom of the Makecode platform, we have the Download option and save option available.
Logic flow for Fortune teller
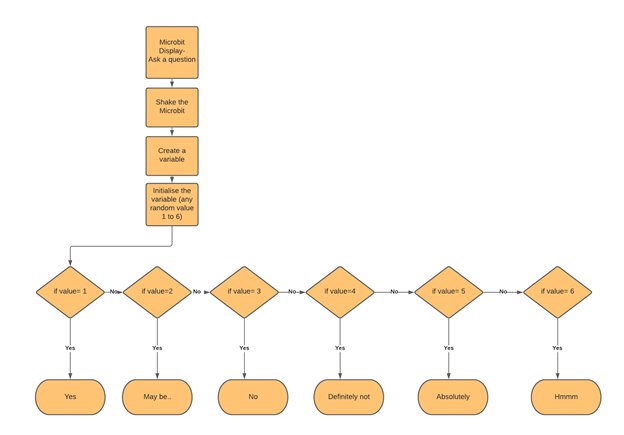
Before making the code the first step is logic development. The logic of the code is shown with the help of a flowchart in the below picture.
Let’s Code (Fortune teller)
As the logic is clear let’s start coding the Microbit.
Ask a question
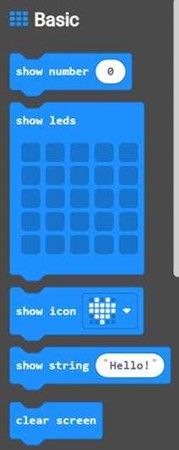
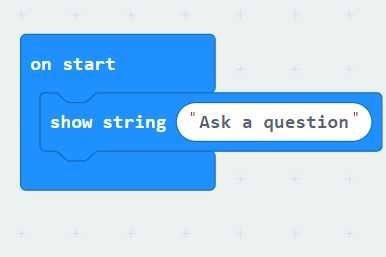
When the Microbit gets powered on i.e. on start, the Microbit should display ” Ask a Question”. We need blocks to display text and an event handler which should trigger the Microbit to display some text (Ask a question so that the user knows). So, we will use the show string block from the Basic category. The show string block will display whatever is written in the show string block. The show string block needs to be stacked inside the on-start block so that the moment microbit is turned on it should display “Ask a question”.
Getting random answer on shake
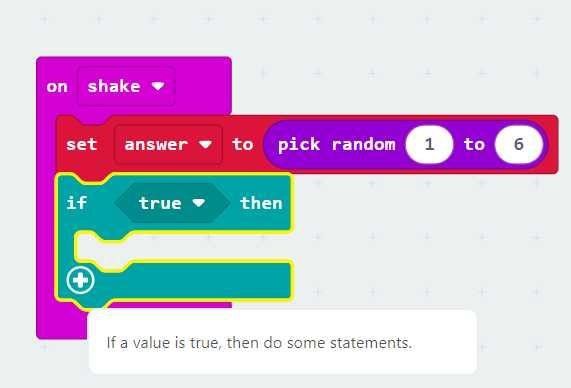
Now the next step is the user thinking of the question. He/she will shake the Microbit to get the random answer. The Microbit can detect when we shake it and then respond according to the code. So, on shake (event handler ) we will create a variable answer. In programming, a variable is a name for a value. A variable is a value that keeps on changing for eg money stored in our piggy bank, weather, President of a democratic country. Using variables allows us to use the same name for different values in our code, so we don’t have to keep track of them all separately.
Let’s create a variable. Go to the variable category of blocks. Press “Make a variable “. Give the variable a name you wish. We will name it “answer”. After creating the variable we need to initialize it. The variable can take any value in the range of 1 to 6. The only criteria are the answers need to be selected randomly. For selecting the answer (variable) randomly we will use the block ” pick random” from the Maths category.

Initializing a variable and giving it some random value from 1 to 6
When we shake the microbit every time the variable will be set to some random value. Depending on the value of the variable the microbit will display the answer. Referred to Figure no. if the answer (variable) is 1, the microbit will display Yes. If the answer (variable) is 2, the microbit will display Maybe…
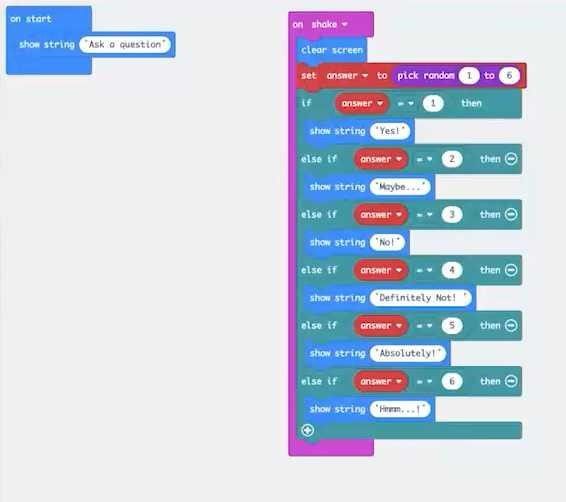
For coding this logic we will make use of conditionals. Conditionals are statements that always return true or false. For example, if the condition is true (temperature>15) then display a smiley. Similarly in our case corresponding to the value of variable a particular answer (text will be displayed on Microbit). The if block can be used from the Logic category.
Now we need to put the condition in the if block. From the logic category, we will use the comparison block. We will compare the answer variable with number 1. If both are equal then Yes will be displayed on Microbit. If both are not equal then it will check for another condition ( ” answer =2 ” and subsequently till 6).
The number of conditionals (if loop) can be increased by clicking on the plus sign as shown in the above picture. The final code is shown below in the picture for reference.
Testing the Fortune teller Code
It’s time to test the code. We can test our code in the Microbit simulator. Use the highlighted options in the picture to test the code.
The code for the fortune teller is complete and tested.

Downloading the Code
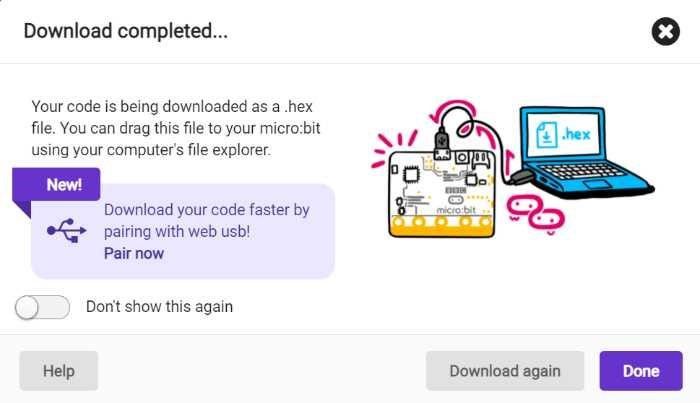
Now we can download the Fortune teller code on our Microbit. We need to connect our Microbit with a Micro USB cable. The other end of the cable will go into the USB port of our computer. The Microbit is connected. You will see the Microbit connected as a drive. After this press the Download button in the Makecode editor. You will see the following pop-up. Press the Done button. The file will be saved as a Hex file in the Downloads section of our computer. copy the file from the downloads folder and paste it on the Microbit drive.
Time to have fun
Now you are ready to have fun with your fortune teller. Think of some interesting questions in your mind. Let your creative mind run and the random number generator will give you what’s the predicted fortune.
In order to build future-ready creators, we at SkoolOfCode believe in a holistic STEM-based coding for kids curriculum that is personalized to fit the needs of each student. So, why wait and Book a FREE trial class today.
Hope you enjoyed working with Microbit. Thank you for reading!