We all have been using smartphones for more than 2 decades and there are lots of apps that we come across in our daily life. One of the apps that you can create with MIT App Inventor is a Wordbook app. A wordbook app is like a mini dictionary that helps the user add a new word and its meaning, search it and view its meaning, and view all the added words.
MIT App Inventor is a cloud-based platform that lets users create mobile apps using block based coding for kids. The ease of use and the simple drag-and-drop interface makes it popular among children and young adults who want to learn about computational thinking and creating apps for Android phones. To create a Wordbook app, prior knowledge of MIT App Inventor is mandatory.
Concepts to be Learned
- Dictionary data type
- Store key/values
- Get the values from the key
- Convert keys to list
- Display layout as the screen.
- Store dictionary to the database(For android only)
Creating the project
The first step would be to create a new project from Projects-> Start new project and name it Wordbook.
Design the Front End of the App
Designing the front end of the app is the first step of app development which needs some planning like how the layout will looks, which component will be used, how many screens will be there in the app etc.
Before we start, let’s understand the screen layout. This app will show different pages/screens for different buttons. For this, we can add a new screen for each button or we can use the layout as screens. We have used the layout as screens in this app, which will make your app lighter on the resource used because every screen we add is like creating a new app.
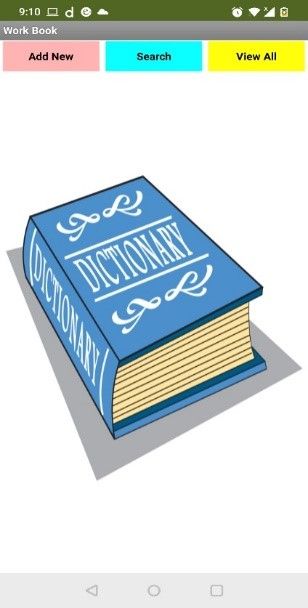
To design the first screen, follow these steps
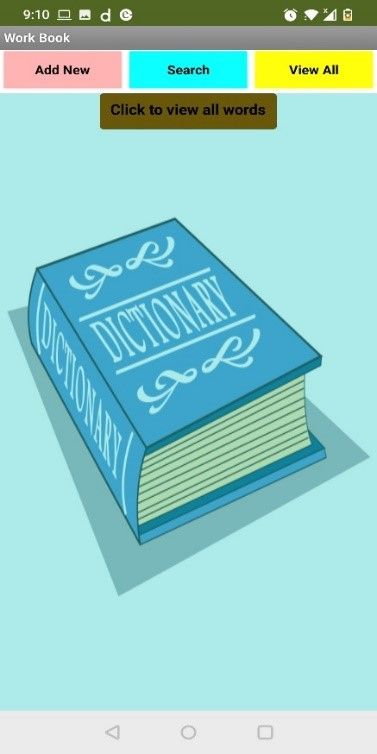
- Change the Title property of the Screen to “Wordbook”.
- Add a background image to the screen from the “BackgroundImage” property of the screen.
- Add a horizontal arrangement from the Layout drawer and change the “Width” property to “Fill Parent”.
- Add three buttons in the horizontal arrangement as follows:

Rename the buttons as shown above and change the Text property to (Add New, Search,View All) and Width to “Fill Parent“. Each button when clicked has a layout arrangement that will be visible.
Adding Layout arrangement as screens
Add New Button: “Add New” button will display the layout arrangement with components to add a new word and its definition and design will look as shown below:
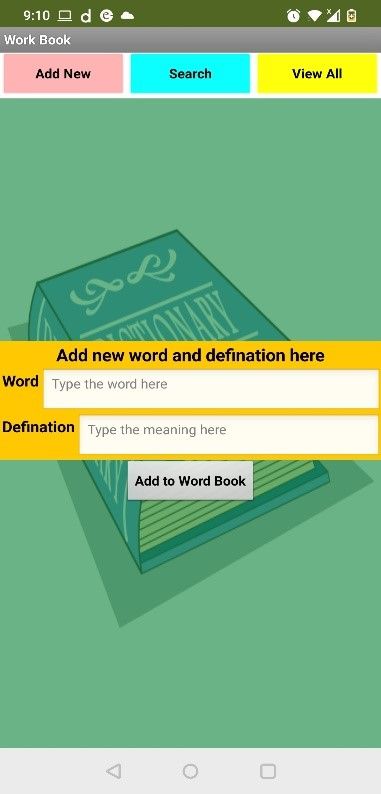
Adding the Layout arrangement for “Add New” button
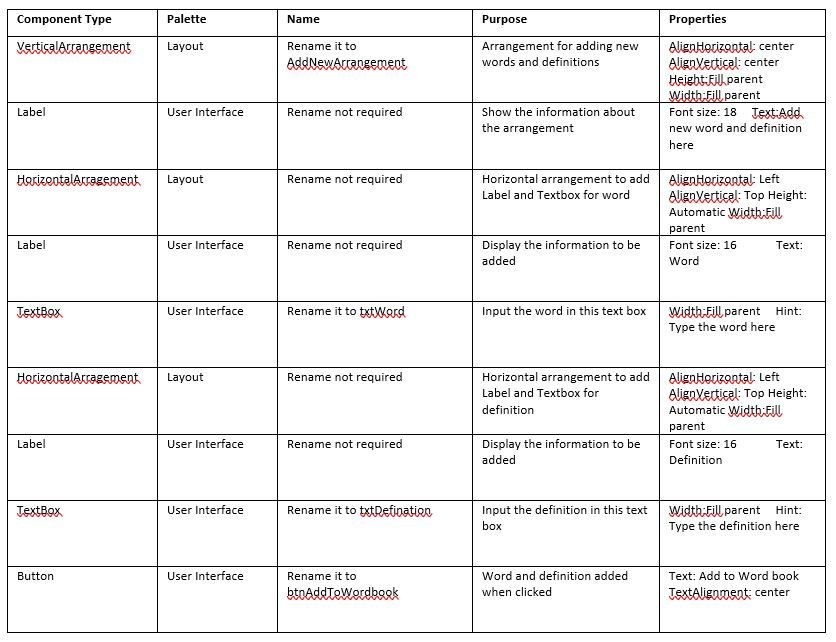
Add a vertical arrangement and Rename it as AddNewArrangement. Add the other components in this arrangement as shown below:
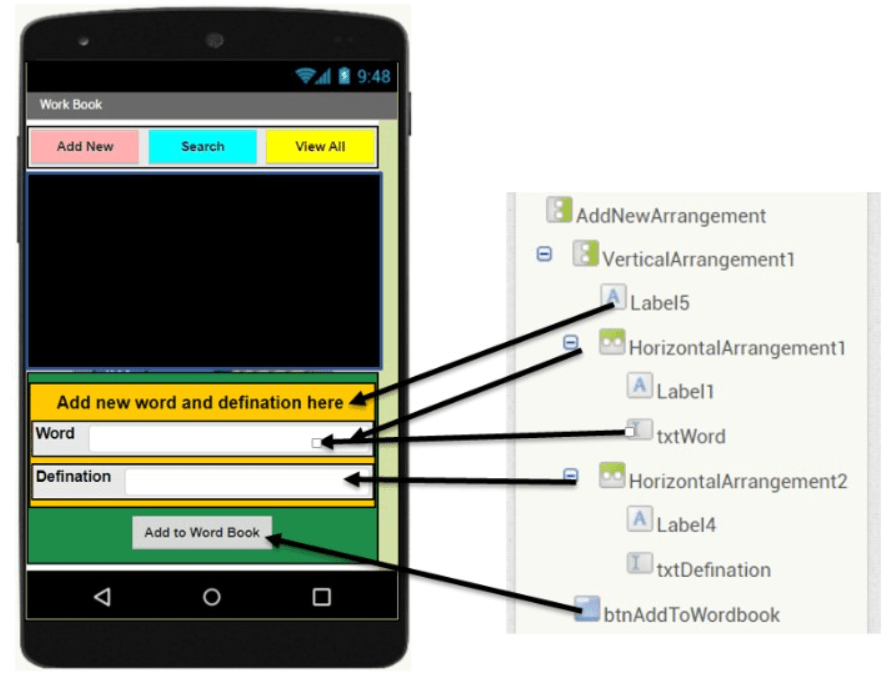
Rename the component and change the properties of the component as shown below.
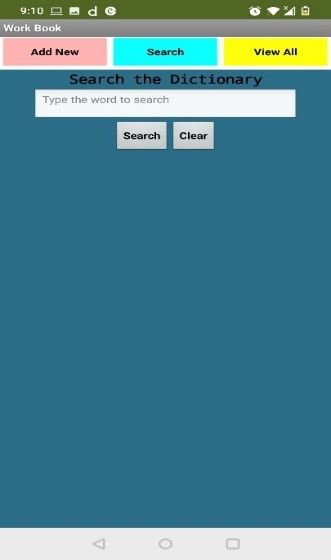
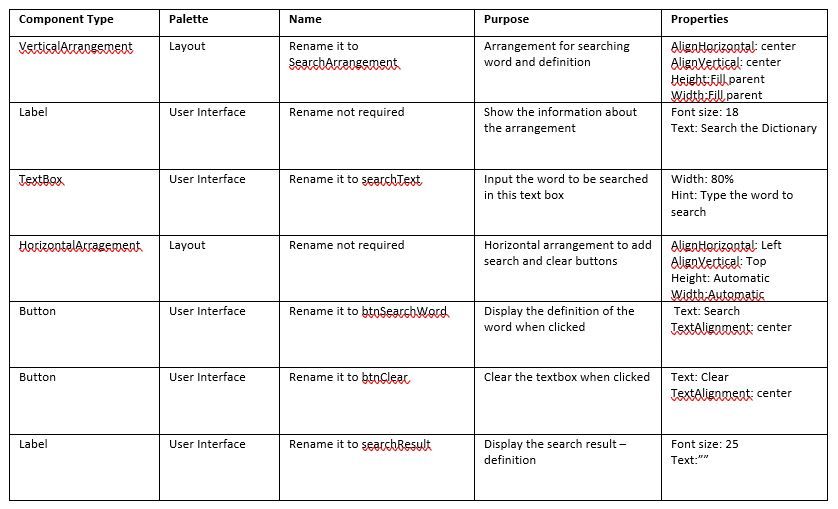
Search Button: The Search button when clicked will display an arrangement with components to search the word and view their definition and will look as shown below:
Adding the Layout arrangement for the Search button
Add a vertical arrangement and Rename it as SearchArrangement. Add the other components in this arrangement as shown below:
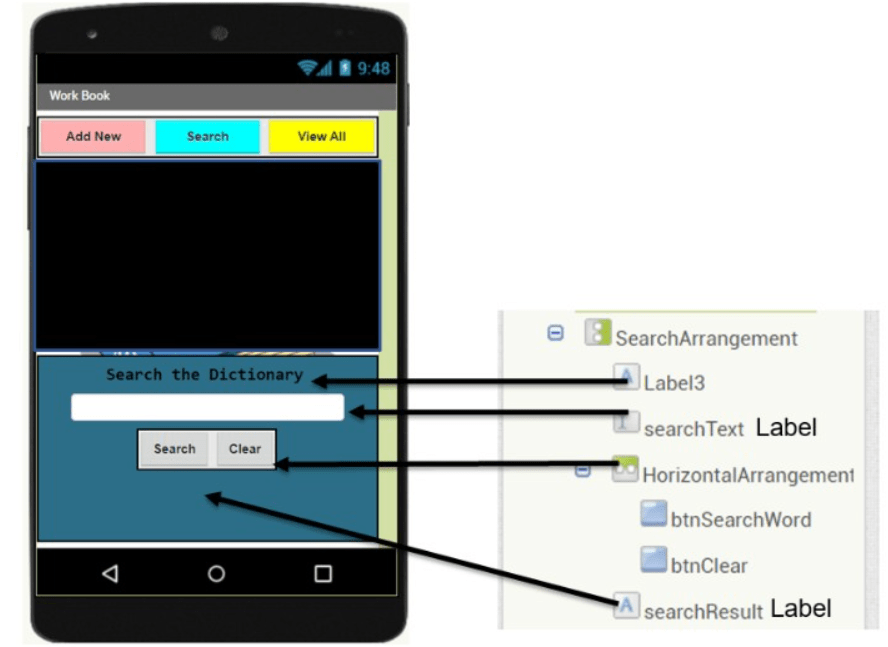
Rename the component and change the properties as shown below:
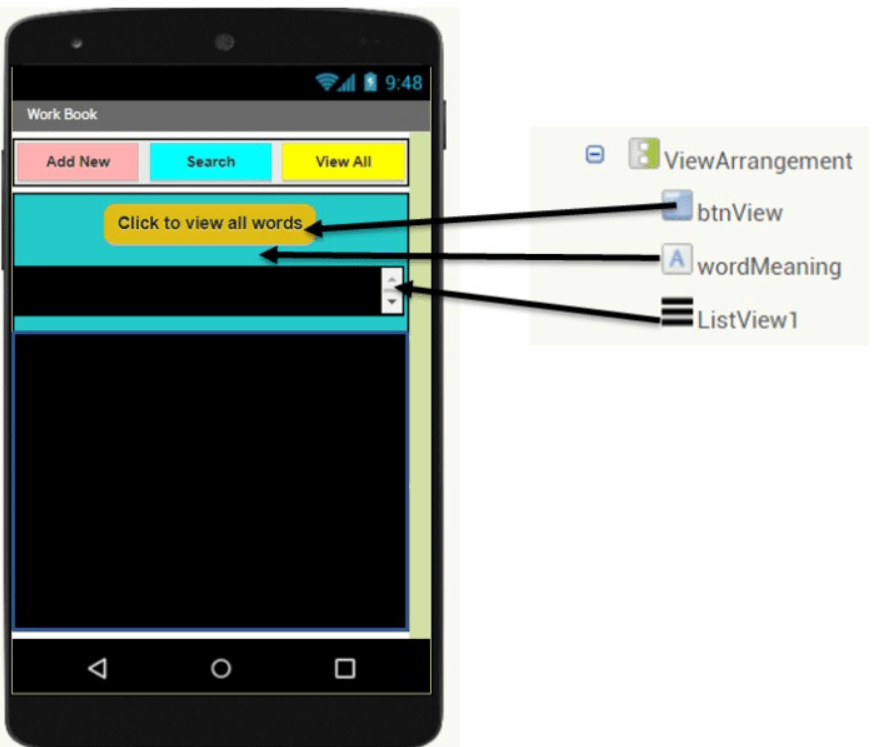
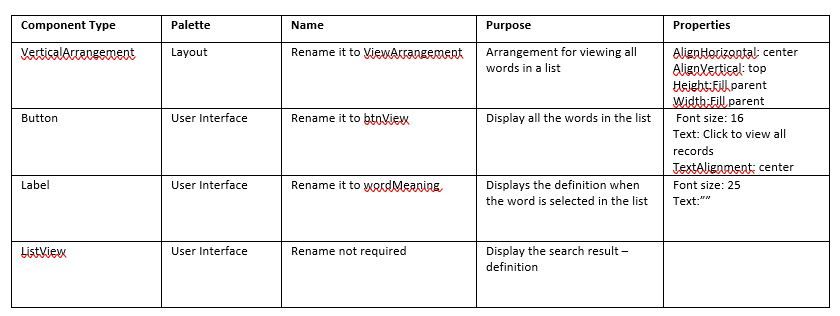
View All Button: View All button will display the layout arrangement with components to view all the words at once and view their definition on the selection of the word.
Adding the Layout arrangement for View All button
Add a vertical arrangement and Rename it as ViewArrangement. Add the other components in this arrangement as shown below:
Rename the component and change the other properties as shown.
Adding Non-visible components
Add these non-visible components from the palette:
- Notifier from the “User Interface” drawer
- TinyDB from “Storage” drawer(only for Android)
The design part of the App is complete and it’s time to move to blocks and learn new concepts.
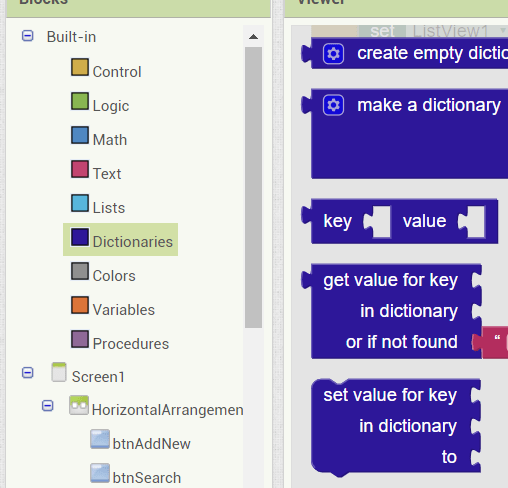
In this app, we will use Dictionaries data so let’s learn about dictionaries.
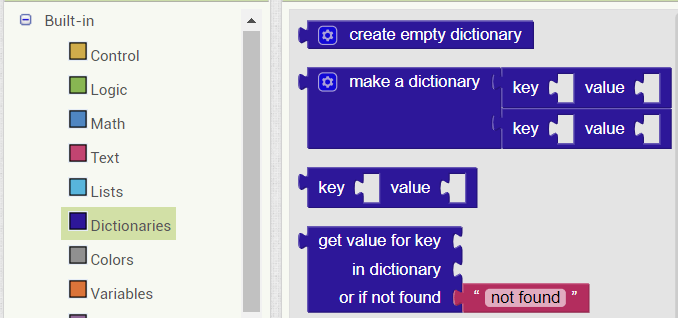
What are Dictionaries?
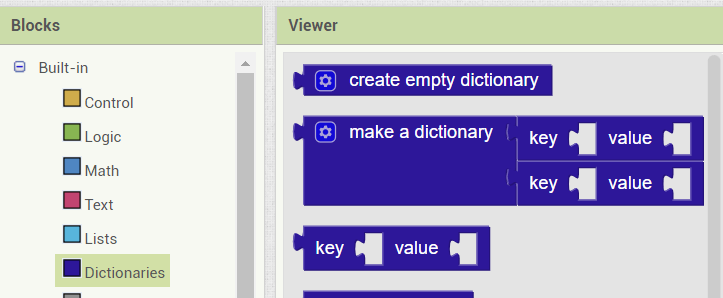
Dictionary is a data structure that can store the data as Key/Value pair. The key is the unique data and value is the data associated with that key. Here in this app, we store the word as the “key” and the definition as “value”.
Adding behavior to the app
Let’s start adding the code by pressing the “Blocks” button on the upper right side, which will take you to the block section.
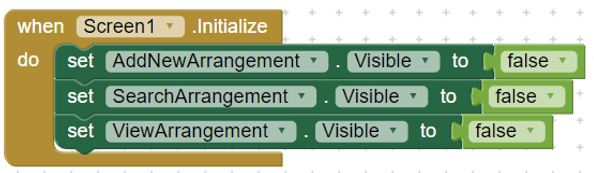
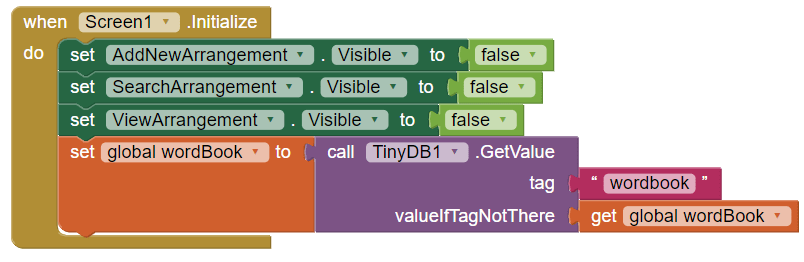
Blocks for Screen initialization
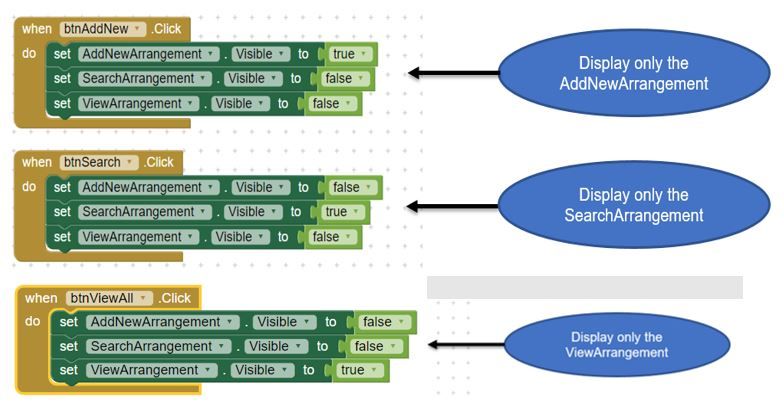
All layout arrangements will be invisible when the app starts. Set the visible property of all the layouts to false.
Blocks for Variable initialization
Create a variable named wordbook with initial value to empty dictionary. Get the “create empty dictionary” block from Dictionaries drawer. This variable will store word and their definition as a dictionary data.

Blocks for getting data from tinyDB
For Android device, we will use tinyDB to store the dictionary and retrieve it when the screen initializes.
To add this, drag the get value block from tinyDB component as shown below
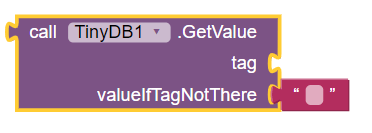
This block returns the value with a given tag, here we will use “wordbook” as a tag and the value stored will be dictionary data. Hence, we get dictionary data from tinyDB which can be stored in the variable wordbook which is of type dictionary.
Get the value(dictionary) from the tinyDB and store it in the wordbook variable as shown below.

Put this block in screen initialization event handler
Blocks for Buttons
Layout arrangements are made visible /invisible depending upon the button clicked by setting the visible property to true/false.
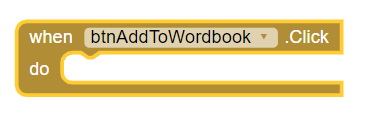
Blocks to add new word/definition in the Dictionary
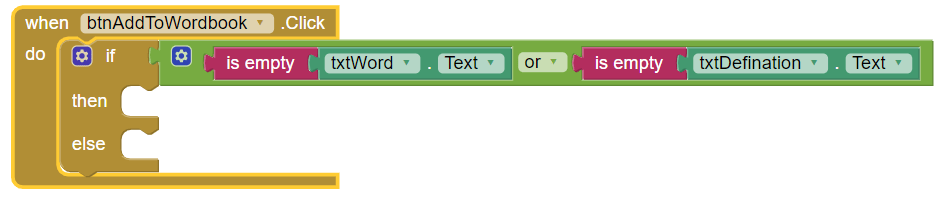
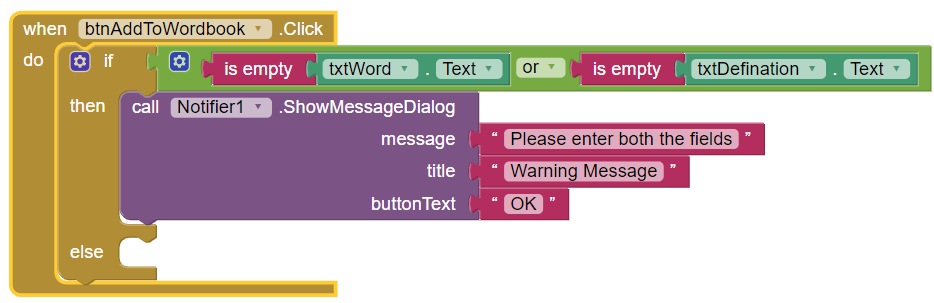
From the Blocks, get the clicked event handler for btnAddToWordbook.
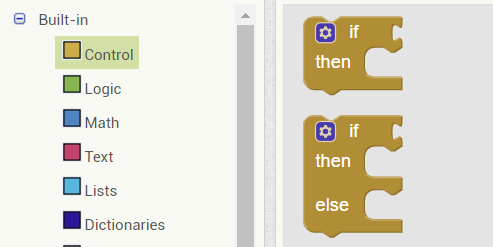
From the Control drawer, get the if then/else control
Now, we will add a condition to check whether the word and definition input textbox is empty.
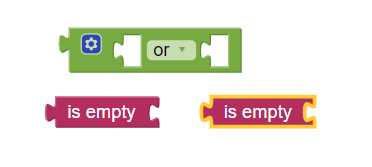
From the Logic drawer, get the logical “OR operator” block and from Text drawer get 2 “is empty” blocks as shown below.
Now we add this condition in the if/then else block and check if txtWord and txtDefination is empty of not.
Add a block from the Notifier component to display the warning message when the textbox is empty.
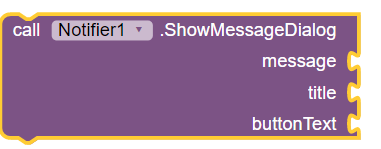
Add the message, title, and buttonText as shown below using the Text block.
In the else section, we will add the blocks to add word and definition in the dictionary. Also, store dictionary data into tinyDB(only for Android) and then clear the text box.
Using this block, we will add word and definition into dictionary. Word will be stored as “key” and definition as “value” as follows:
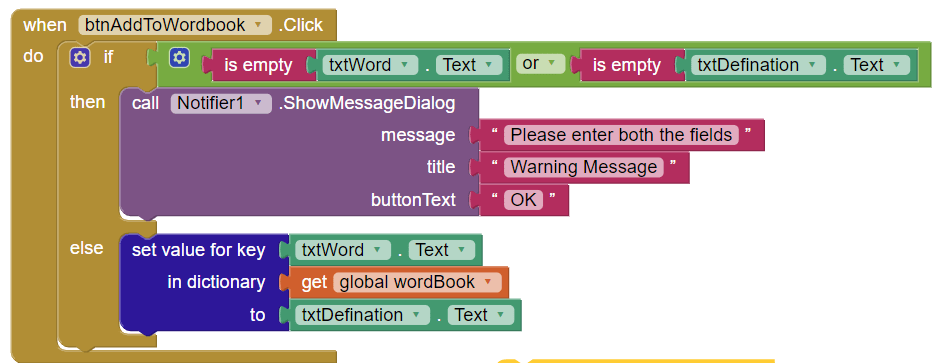
Next, we store dictionary into tinyDB(this only applies to android devices) using the tag “wordbook”.
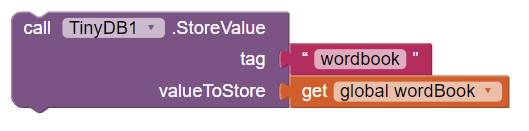
Place this block in the else block as shown
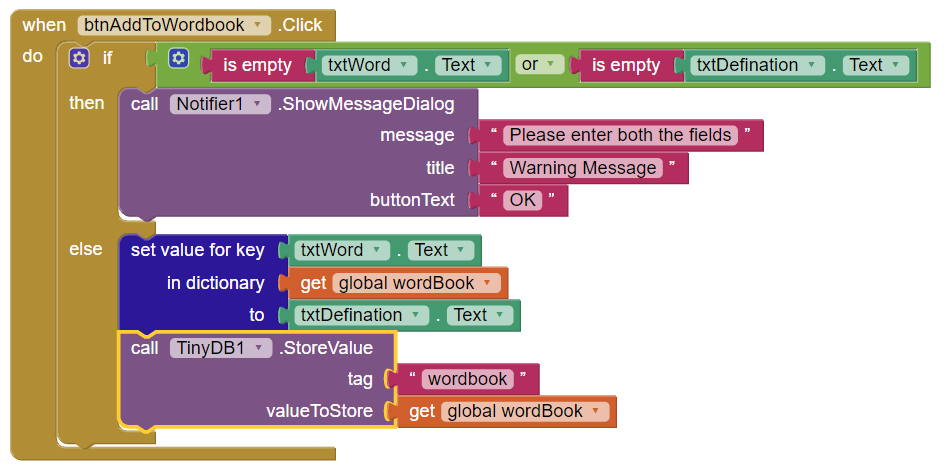
Add a “ShowAlert” block from Notifier component to show alert message and clear the textboxes as shown below:

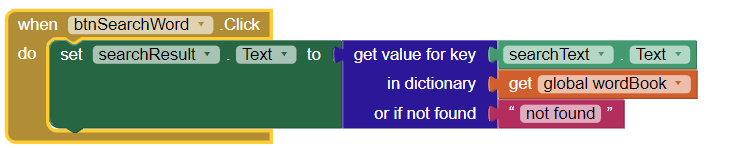
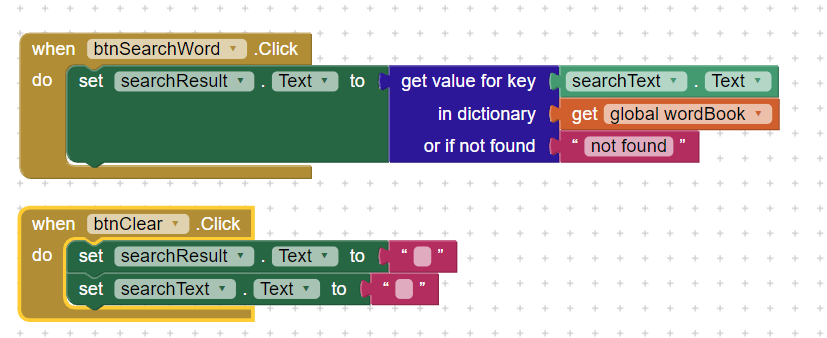
Block to Search Word
From the Blocks, get the click event handler from btnSearchWord
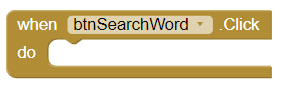
Add the blocks to display the definition in the Label when btnSearchButton is clicked
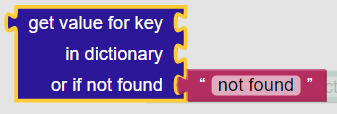
From the Dictionaries blocks, we use the block to search the key(word) in the dictionary as shown below
Add the blocks as shown below to set the Text property to value(definition) for searchResult Label.
Add the btnClear click event handler and clear the textbox.
Blocks to view all words
From the Blocks, get the clicked event handler from btnView. Now we will display all the words in the ListView when the button is clicked. For this, we will convert the keys into List and display them in the ListView.
Now, drag the get Keys block from the Dictionaries drawer as shown below:

Set this to the ListView.Elements property as shown below in the btnView event handler.

This will display all the words in the List View. Now, when we select any word from the list view it should display the definition of that word in the Label.
From the Blocks, get the AfterPicking event handler from the ListView component.
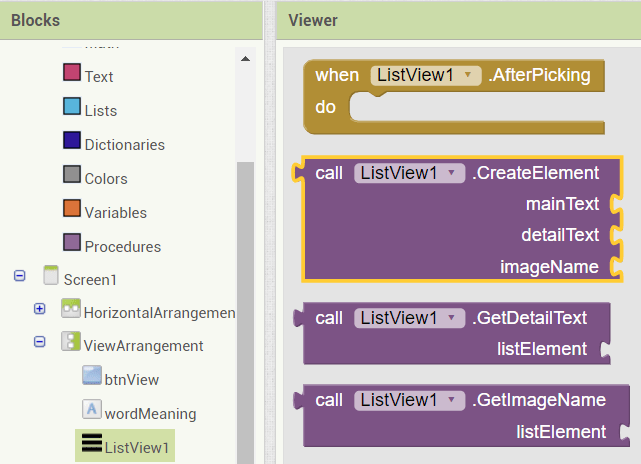
After this we need to add the blocks to display the definition in the Label.
Now, get the set Text block from the wordMeaning Label as follows:

Next, drag this block from Dictionaries drawer to get the value of the key from the dictionary.
Get the blocks from ListView to get the selected word from the ListView

Now, we add the block as shown below

Congratulation! With this we complete the coding of the Word Book App.
Time for Testing
Test the app by connecting your phone with the AI Companion in MIT App Inventor by scanning or entering the QR code. Please make sure to install the MIT AI companion app on your phone from the Play store(android) and App store(iOS). Test the app by adding new words and definitions and then searching for the word.
This app can be a very useful app for educational purposes for students to add words/definitions that they come across in their everyday life and keep a record of them. The same app can be used for different purposes for e.g. instead of adding words/definitions, we can add different data like phone no/name, country/capital, and country/currency and the list is endless.
Are you seeking introductory programming courses or a place to engage your child in online coding classes for kids? To build future-ready creators, we at SkoolOfCode believe in a holistic STEM-based coding curriculum that is personalized to fit the needs of each student. So, why wait and Book a FREE trial class today?
By – Ms. Vineeta Chaudhary, an Educator at SkoolofCode with B.E in Computers. She is an expert in block-based coding which includes platforms, like Scratch, MIT App Inventor, and Thunkable.