Scratch is a visual programming language designed to make coding for beginners easy and accessible, especially for young learners. Through its block-based coding for kids, Scratch turns learning into an engaging, fun, and affordable experience. One of its most powerful features is cloning, which allows users to create multiple instances, or “clones,” of a sprite that can each function independently. This ability is beneficial for designing projects where similar objects appear and act in various ways, like enemies in a game, stars in the sky, or raindrops in an animation.
By the end of this guide, you’ll not only understand what cloning in Scratch is but also learn how to use it to build your own unique game. This article covers everything you need to know about Scratch clones, from basic setup to advanced uses in creating dynamic elements. Explore how cloning in Scratch can open up endless creative possibilities.
If your child loves playing video games and wonders how they are built, Scratch clones are a great place to start. At SkoolOfCode, kids learn how to use features like cloning to build their own playable game versions, one block at a time.
What you’ll learn:
- What Are Scratch Clones?
- Benefits of Using Scratch Clones
- How to Use Clones in Scratch
- Build a Game with Clones in Scratch (Step by Step)
- Scratch Clones FAQ
What Are Scratch Clones?
In Scratch programming, creating a “clone” doesn’t mean copying someone else’s work. Instead, it refers to creating multiple instances of a sprite that behave similarly but act as independent objects in a game. Scratch clones are super useful for making things like falling obstacles, collectible items, or even characters that interact in complex ways.
Whether you’re a beginner in Scratch or already have some experience, this blog will guide you through the basics of using clones in Scratch and show you how to make your own Scratch game using clones.
Benefits of Using Scratch Clones
Cloning in Scratch offers several powerful benefits:
- Simplifies Your Code: Rather than creating separate sprites and writing unique code for each instance (like every bullet in a game), cloning allows you to write one set of instructions that applies to multiple objects simultaneously, streamlining your project.
- Enables Dynamic Animations: Cloning brings animations to life, allowing you to create dynamic scenes with moving objects like flying birds or bouncing balls. This feature generates multiple objects on demand and controls their behavior, making your animations feel engaging and responsive.
- Optimizes Game Design: Cloning is highly effective for designing games that need multiple instances of elements like enemies, obstacles, or collectibles. Each clone can be controlled individually or set to perform actions automatically, all while originating from a single sprite.
- Improves Performance: By reusing a single sprite and making copies, cloning conserves memory and ensures smoother performance, reducing the need to create separate sprites for each instance.
How to Use Clones in Scratch
Cloning in Scratch is easy to implement with just a few simple blocks. Follow these steps to add clones to your project:
- Create Your Sprite (Character or Object)
Start by choosing or designing the sprite that you want to clone. This could be any character, object, or graphic you wish to replicate throughout your project. - Use the “Create Clone” Block
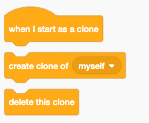
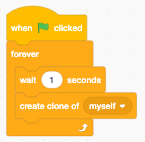
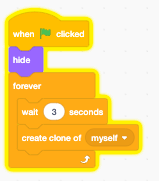
To generate a clone of your sprite, use the “create clone of [myself]” block from the Control category. This block tells the sprite to create an identical copy of itself.- You can place this block inside a script to control when and how often clones are created. For example, using it with a “when green flag clicked” block will start the cloning process when the project begins, or you could place it in a “forever” loop to continuously create clones at regular intervals.
- Define Clone Actions
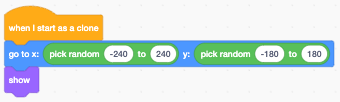
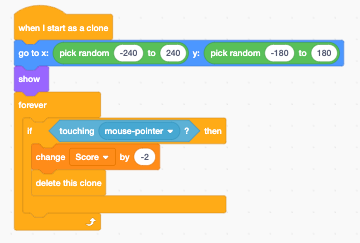
Once a clone is created, you can control its actions with the “when I start as a clone” block, found in the Control category. This block lets you define the behaviour of each clone after it’s created.- For instance, you can make the clone move, disappear after a certain time, or interact with other sprites. The code you attach to this block will apply only to the clones, leaving the original sprite unaffected.
- Remove Clones When Done
After a clone has completed its task, you may want to delete it. Use the “delete this clone” block to remove the clone from the project. This is helpful for objects like bullets or falling items that need to come and go throughout the project, keeping everything efficient and tidy.
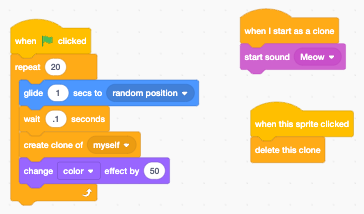
Quiz Time: Let’s test your understanding of the Cat sprite code. Answer the following questions:
- How many clones of the Cat sprite will be created?
- Consider any loops, events, or conditions that determine the cloning process.
- What actions occur each time a new clone is created?
- Describe any specific behaviour’s or changes that happen as soon as a clone is generated.
- What will happen to a clone if you click on it?
- Think about any interaction events programmed for when the Cat or its clones are clicked.
Build a Game with Clones in Scratch
Now that you’re familiar with the process, let’s explore a simple project that uses cloning to create multiple copies of a sprite.
Jewel collector game

Open Scratch: Head to Scratch and create a new project.
- Choose a Sprite: Select or create a sprite that you want to clone(Let’s say it’s an item to collect (like a crystal).
- Add a Background: Set up a suitable background for your game.
Step 1: Creating Basic Clones
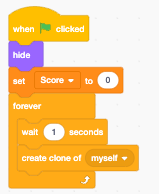
The first thing we’ll do is set up our sprite to start cloning itself. Here’s how to make a simple coin-collecting game where coins appear randomly, and you collect them for points.
- Select the Sprite:
- For this example, we’ll use a “Crystal” sprite.
- Make the Clones Appear Randomly:
- We want the crystal to spawn randomly around the screen, so we’ll make it create a new clone every few seconds.
- Add the following code to the Crystal sprite:
- Here, every second, a new clone of the Coin sprite will appear.
3. Set the Position of the Clones:
-
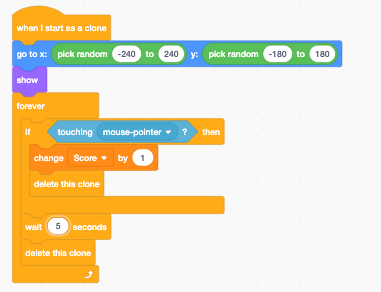
- Now, we’ll make each clone appear in a random spot on the screen when it’s created.
- Add this code:
- This way, each crystal clone will appear in a new random location every second.
Step 2: Making Clones Interactable
Let’s add code so that when the player’s main character touches a crsytal, it collects it and increases the score.
- Detect When the Player Touches a Coin:
- Go back to the Coin sprite and add the following code to check for collisions with the player:
- Now, when the player touches a crystal, it disappears, and the score goes up by 1.

Step 3: Display the Score
To keep track of how many crystals the player has collected, we’ll add a score variable.
- Create a Score Variable:
- Go to the Variables section and click “Make a Variable.”
- Name it “Score” and make sure it’s visible on the screen.
- At the beginning of the game, set the score to zero with this code in the Crystal sprite:
Step 4: Removing Clones
For many games, it’s a good idea to set conditions for when a clone should disappear if it’s no longer needed. This prevents having too many clones on the screen at once, which can slow down the game.
Limit the Lifetime of Each Coin:
Add a timer to each clone so that it disappears after a few seconds if it isn’t collected. In the Coin sprite, add:
Step 5: Adding Obstacles Using Clones
Let’s add another layer to the game by introducing obstacles (like rocks) that the player should avoid.
- Create an Obstacle Sprite:
- Add a new sprite for the obstacle.
Set it to clone itself every few seconds and move across the screen. Here’s an example of how to code it:
2. Move the Obstacle Clones:
Program each obstacle clone to move across the screen from a random point.

3. Add a Collision Check:
In the Obstacle sprite, add code to detect when the player collides with an obstacle:
- Now, when the player hits an obstacle, they lose a point.
Step 6: Add a Winning Condition
To set up a winning condition, follow these steps:
- Check the Score
- Use an if block to check if the score is greater than 50.
- Display the Win Message
- Inside the if block, display a message like “You win!” or trigger an action to indicate that the player has won the game.
- Stop the Game
- Optionally, add a stop all block to end the game once the winning condition is met.
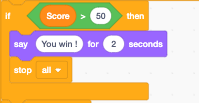
Now, if the score goes over 50, the game will display the win message and end.
Step 7: Test and Improve the Game
- Run your game to test how well the clones appear, disappear, and interact with the player.
- Adjust timings, clone speeds, and positions as needed.
- Add sounds or visual effects to make the game more engaging.
Looking to enhance your child’s coding skills with fun and engaging lessons? Join SkoolOfCode for interactive Scratch programming online coding classes for kids. Our expert instructors will guide young learners through exciting projects, building a strong foundation in coding.
Scratch Clones FAQ
What is a clone in Scratch?
A clone in Scratch is a copy of a sprite that the program makes while your project is running. Each clone runs the same scripts on its own, so a single sprite can become a whole swarm of moving objects, such as falling raindrops or a row of enemies, without you building each one by hand.
How do you make a clone in Scratch?
Use the “create clone of myself” block from the Control category. Place it inside a loop, such as a forever or repeat block, so new clones appear at the timing you choose. Then add a “when I start as a clone” block to tell each clone how to behave once it appears.
What is the difference between cloning and duplicating a sprite in Scratch?
Duplicating a sprite makes a second, separate sprite in the editor before you run the project, and you manage its code on its own. Cloning happens automatically while the game is playing and reuses one sprite’s code, which keeps your project smaller and far easier to update.
How do you delete all clones in Scratch?
Add the “delete this clone” block to the end of a clone’s script so each clone removes itself once its job is done. To clear them in one step, you can stop the project, or broadcast a message that tells every clone to run “delete this clone.”
How many clones can you have in Scratch?
Scratch allows up to 300 clones at one time, whether or not they are visible on the stage. Any “create clone” blocks beyond that limit are ignored until some clones are deleted, so it is good practice to remove clones your game no longer needs.
About SkoolOfCode
SkoolOfCode is a premier online platform dedicated to teaching coding for kids through engaging and hands-on projects. We offer a wide range of courses, including Scratch programming, Python for beginners, and Robotics, all designed to spark creativity and foster a love for technology. Our certified instructors create a supportive learning environment, making coding accessible and fun for students of all ages.
Start your coding journey with SkoolOfCode today and inspire creativity everywhere you go.
Conclusion
Cloning in Scratch is a versatile feature that lets you create multiple copies of a sprite while your project is running. Whether you’re working on a game, animation, or interactive story, cloning can simplify your code and make your project more efficient.
Mastering cloning will allow you to build more dynamic, complex projects that captivate and entertain. So dive in and start experimenting with cloning, you’ll be amazed by what you can create!
Get started with fun coding lessons for kids, where young learners are introduced to the digital world of coding through engaging, hands-on experiences Sign up for a free trial class today and unlock your child’s potential in the world of digital creation.
Ms.Manpreet Virk, an educator at SkoolOfCode with a degree in M.Phil and Master in Computer Science. She is passionate about learning and teaching young minds.