Making is fun, and with Makey Makey, you can turn everyday objects into touchpads! Makey Makey helps students to put their ideas into a real-world context and see how they work in the real world i.e., beyond the screen. Do-it-yourself activities promote exploration, tinkering, and creativity.
Makey Makey is used in the Computer Science curriculum around the world to teach electrical circuits, input and output devices, and programming basics. Makey Makey is used in kids’ programming courses and in adult Computer Science education as well.
In this blog, we’ll learn how to use a Makey Makey to create a custom or DIY mouse controller. All you need is some conductive materials and an internet-connected computer. Let’s get started! You can use all sorts of materials to create your own unique mouse, from fruits and vegetables to coins, foil, and paper clips. Our students brainstormed and created their own version of the mouse. All you need is some creativity and a few supplies and you’ll be on your way to controlling your system with your very own creation. Creating your own mouse is so cool! You don’t need any special skills or knowledge, just a Makey Makey and a little creativity.

Makey Makey with different apps opens up a world of possibilities for making your own controllers. You can use Makey Makey to control your system in so many ways. Let’s get started. Let’s use the mouse to splash colors on the screen. You can design your own mouse to control your system. Makey Makey is an invention kit that allows you to turn everyday objects into touchpads. A computer mouse is an input device that is most commonly used with a personal computer. The mouse is used in order to control the graphical user interface of a computer
What you’ll need (Supplies)
– Makey Makey kit
– Alligator clips
– Conductive materials (playdough, tinfoil, fruit, etc.)
– Computer
– USB cable
Let’s start making
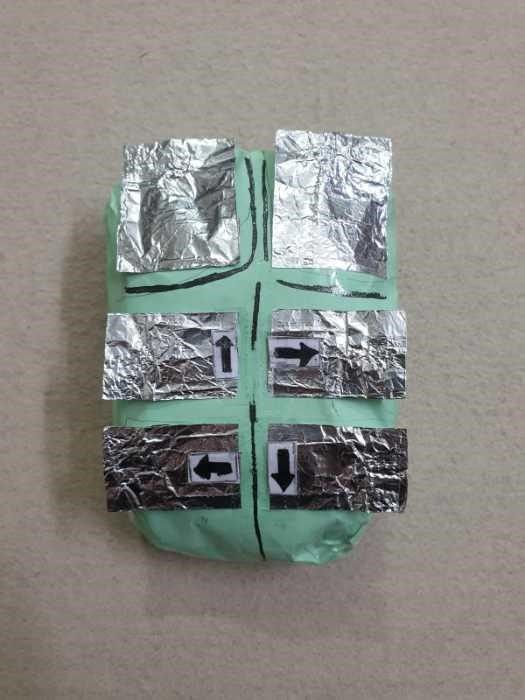
Before making the mouse, we need to brainstorm what our mouse will look like and what will be the function of each part. Design the base of the mouse on which different buttons can rest. Now the next task is to identify the functions of mouse buttons like left-clicking, right-click, Page up, Page down, etc.
After designing the base and understanding the functions of mouse buttons we can now start making our own Makey Makey mouse. In our case, we have placed foil paper which acts as buttons placed on a hard paper. The picture of the mouse is shown below for your reference
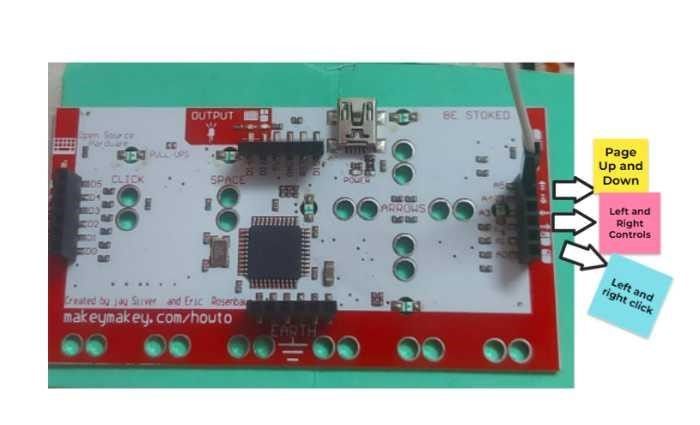
Now it’s time to give life to your design by connecting jumper cables to the backside of the Makey Makey board. One jumper cable is connected in the Page up slot of the board. The jumper cables are in turn connected to the alligator cable, which in turn is connected to the foil. In a similar manner jumper, cable, and an alligator cable can be connected to other mouse control slots.
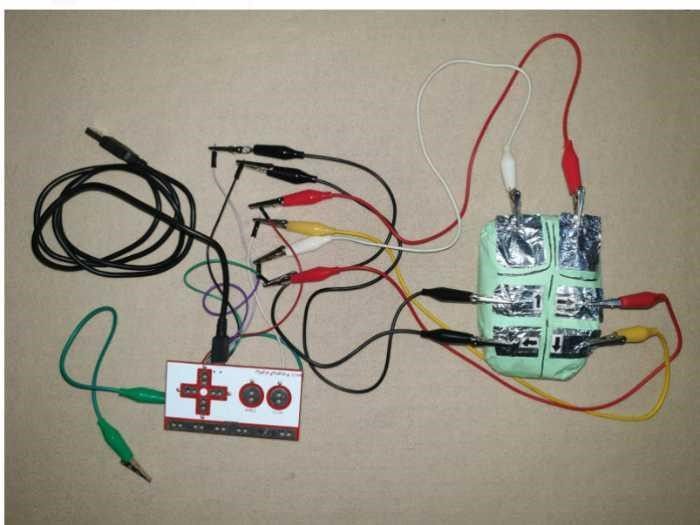
All the mouse controls used in our design are shown in the picture below. For all the controls different jumper wires and alligator cables are used. Also, we need to connect an alligator cable to the Earth terminal of Makey Makey Board.
In order to use the mouse, the user needs to hold the earth cable (metallic part) and then press the foil paper buttons of the customized mouse. You will notice a green light on the Makey Makey board lights up whenever the user holds the earth cable and touches any of the foil buttons. This shows that the circuit is complete and the Makey Makey board is recognizing your touch.
Time to have fun with the mouse
As we have created our own mouse it would be a great idea to have some fun. The Google Doodle team has created a fun interactive doodle for Holi, which lets users splash color on the screen using their computer mouse. The doodle features a group of men and women celebrating Holi, with color powder being thrown in the air and on-screen. Users can click and drag their mouse cursor over the different colors to splash color.
Now it’s time to have some fun with the mouse. Let’s use the mouse to splash color on the screen. For this, we will use the Google Holi feature. The steps to splash color on-screen are summarized below:
– Go to google.com
– Search for Holi
- Click on the heap of colors as seen in the picture below

– Now you can splash color with the left click of the Makey Makey mouse. Use the foil buttons to move the mouse up, down, left, and right. Splash color on screen using the left click.

It was so fun to splash colors on the screen with our customized mouse.
Makey Makey is not just limited to making a mouse. It can be used to create all sorts of fun and interactive music and game projects. You can learn Makey Makey at SkoolofCode which provides the best coding classes for kids. Some interesting projects of our students in the Makey Makey course can be accessed here. You can check out the blog which captures the essence of our Makey Makey course.

Follow the steps mentioned in this blog and have fun with your new mouse. Also, don’t forget to check out our Makey Makey courses at SkoolofCode which is designed to provide a fun and interactive learning experience for kids. So, why wait and Book a FREE trial class today.
What are you waiting for? Make your own Makey Makey mouse today!
By – Dr. Kadam Bhambari , an Educator at SkoolofCode with Ph.D. and MTech in Electronics. She is an expert in Microbit, Arduino, and Artificial intelligence.