
“How do I introduce coding to my child?” This is a question many parents ask themselves – and Web development is a great place to start. Web development can be a good entry point for K12 kids to start learning coding. Kids can create their own simple websites by starting with building simple webpage with HTML and CSS.
Web development is considered as one of the easiest ways to learn coding. Kids get a chance to learn the basics of website creation, and explore coding in a fun and creative way. Coding classes for kids can also help them do wonders in web development.
In this blog, we will see how to create simple webpage using basic HTML and CSS. This will help you understand the first steps of building website like Anvita’s Portfolio website. Anvita is a student at Skoolofcode. She built her Portfolio website as her project while learning online web development course in Skoolofcode.

So what are webpages? And why we need HTML and CSS for web development? Let’s first understand these basics.
New to coding with your child? At SkoolOfCode, kids build their first HTML and CSS webpages step by step with a live instructor guiding each tag.
What are webpages?
Webpages are documents made up of text, images, videos, and other types of data. And one or more web pages linked together makes a website. Web pages are all around us, so it’s about time you build your own!
But how do we build a webpage? Well, we need HTML and CSS.

Web Development programming
HTML (Hypertext Markup Language) is the standard markup language which creates web pages. CSS (Cascading Style Sheets) describes how HTML elements should look.
HTML tells web browser (like Chrome or Internet Explorer) what text and images it needs to display. HTML also tells where these text and images should appear.
CSS describes how these images or text should look like. By adding some simple CSS styling to your webpage, you can make it look more interesting!
Now that you know the use of HTML and CSS, let’s start building our webpage!
If your child wants to keep going beyond this Hello World page, our web development classes for kids walk them through real projects in HTML and CSS at a pace that fits their grade.
Hello World Webpage in 2 minutes
Follow these steps to build a simple webpage:
- Open any text editor such as Notepad (on Windows), TextEdit (on Mac). You may also use online editors such as WebStorm, Repl, or an IDE like Visual Studio Code.
- Create a new file and save it as index.html. Make sure the extension of the file is .html while saving the file.
- Add the following code to your index.html
<html>
<head>
<title>Hello World! </title>
</head>
</html>
Now save the file and open it in any Web browser on your computer (Chrome/Firefox/Edge, etc.) to view your webpage!
Nice! You created your first webpage!
Let’s build more together with HTML
All things big start with the first step. A big congratulation on getting started and creating your first webpage. Now we get to make this bigger, better, and awesome!
You can see our webpage is a blank white screen and we need to add some content to make it more meaningful. So, let’s do that right away.
Open index.html again in your editor and add the following lines of code into it-
<html>
<head>
<title>Hello World! </title>
</head>
<body>
<h1>Hello World! -Welcome To My First Webpage</h1>
</body>
</html>
This code defines the HTML document of our Web page.
Notice that every tag has a matching closing tag. The opening and closing tags together creates an element on the Webpage.

Here’s an explanation of the code-
<HTML> The first line <html > is the opening tag. Web browsers know that all elements between <html > and </html> are HTML tags for creating Web pages.
<HEAD> The second line < head> tells Web browsers to display anything between <head> and </head> in the header of Web page. Different Web browsers use different information from this section while indexing your webpage.
<TITLE>We have given the title to our webpage as “Hello World!” using <title> tag within our <head> tag.
<BODY>Then there is a <body> tag. Web browser displays everything between <body> and </body>, as the content of Web page. This time we have a heading 1 (<h1>) tag along with the text “Hello World! -Welcome To My First Webpage” inside it. There are 6 levels of heading sizes- <h1> is the largest, <h6> is the smallest.
It’s time to view your Webpage!
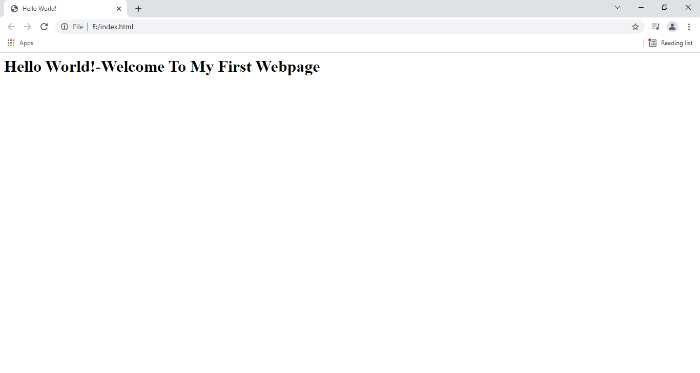
Save index.html and open it in a Web browser again to see how it looks.
Now your webpage should look like this-
We can add some more text inside <body> tag as follows-
<html>
<head>
<title>Hello World! </title>
</head>
<body>
<h1>Hello World! -Welcome To My First Webpage</h1>
<p>Skoolofcode - Web Development is so much fun!! :) </p>
</body>
</html>
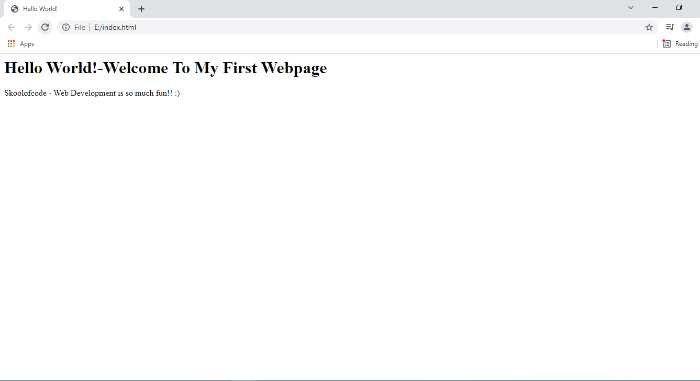
We just learned that with a p tag (paragraph) you can add text to your webpage. How simple was that?
This is how your webpage should look like now-
Styling the webpage with CSS
We added some content in the webpage. Let’s now style it.
Font color
Let’s start by adding come color to the text. So go ahead and update your index.html file as follows:
<html>
<head>
<title>Hello World! </title>
</head>
<body>
<h1 style="color:blue;">Hello World! -Welcome To My First Webpage</h1>
<p style="color:red">Skoolofcode - Web Development is so much fun </p>
</body>
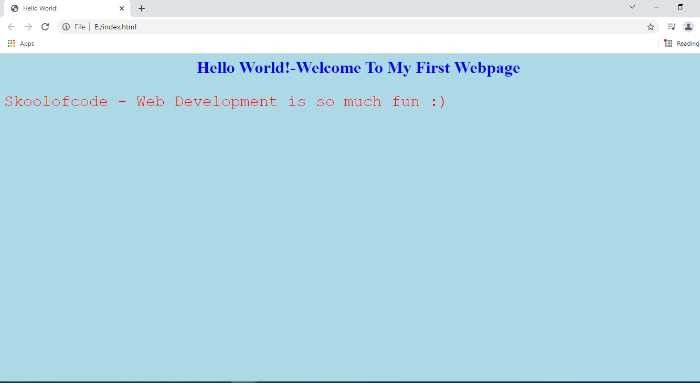
</html>Open the index.html file again in the browser and, you can see how our webpage looks now. What did we do? We used CSS (style attribute) to change the color of our text! Isn’t that super easy?
Quick explanation-
In an opening p tag, we used style attribute. Style attribute has 2 parts- property – the property we want to apply (color property in our case) followed by a colon (:) value – the value for the property (red in our case).
Some more CSS styling
Let’s do some more styling using other CSS properties-
<html>
<head>
<title>Hello World! </title>
</head>
<body style="background-color:lightblue;">
<h1 style="color:blue;text-align:center;">Hello World!-Welcome to My First Webpage</h1>
<p style="color:red;font-size:30px; font-family: Courier;">Skoolofcode - Web Development is so much fun :) </p>
</body>
</html>
What did we do with CSS?
Background color to webpage
We applied background color to the whole webpage using the background-color property in the body tag.
Text Alignment
We used the text-align property to align the heading in the center of our webpage.
Font Size
We used the font-size property to change the text size to 30 pixels and the font-family property to change the text font to Courier in the paragraph.
Also you must have observed that we can use style attribute to apply many styles altogether! Make sure you separate each property-value pair with a semicolon (;).
This is how your webpage should look like now-
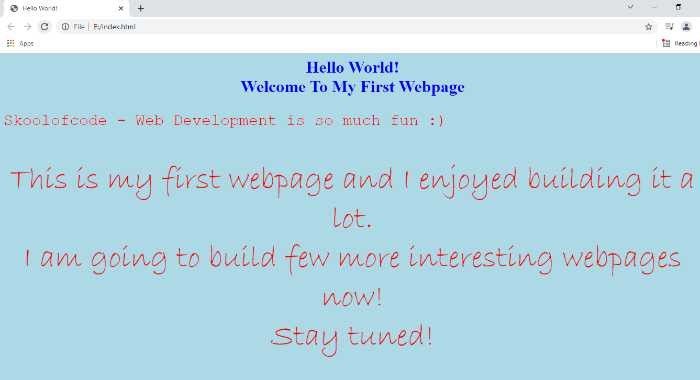
You can add as many p tags of text in your webpage as you want. Let’s add some more text-
<html>
<head>
<title>Hello World! </title>
</head>
<body style="background-color:lightblue;">
<h1 style="color:blue;text-align:center;">Hello World!<br>Welcome to My First Webpage</h1>
<p style="color:red;font-size:30px; font-family: Courier;">Skoolofcode - Web Development is so much fun :) </p>
<p style="color:red;font-size:60px;font-family:Bradley Hand ITC;text-align:center;">
This is my first webpage and I enjoyed building it a lot.<br>
I am going to build few more interesting webpages now!<br>Stay tuned! </p>
</body>
</html>
Line breaks
Okay, so we added a br tag here. What’s the deal with br tag?
Well, insert some new lines in your Webpage where you want to add some space. The br tag (Line break) will come in handy here! And it has no closing tag.
Also, notice how we styled this paragraph with different text size and text font.
Here is the final look of our webpage-
You built and styled an awesome webpage all by yourself! Give yourself a high five for completing your first Webpage using HTML and CSS! It’s just a beginning in your journey of web developer course. Book a FREE trial class today to learn and create more.
Hope you are having fun! We will learn more about HTML and CSS in the next article.
Few takeaways for you with some more HTML tags-
- Use the background-color property to apply some background color to the text within the p tag or h1 tag.
- Use any other heading tag like h2, h3, h4, h5 or h6.