
As parents, we’re always on the lookout for fun and educational activities that will engage our children and encourage their creativity. In today’s digital age, coding has become an essential skill, and at SkoolOfCode, we are committed to providing top-notch coding classes for kids aged 6-16. One of the most exciting tools we use to teach coding is the Micro:bit, a pocket-sized computer designed by the BBC to inspire young people to get creative with technology.
In this blog post “Using Micro:bit as a Game Controller with Built-in Motion Sensor and Scratch Extension”, we’ll explore how the Micro:bit can be used as a game controller, utilizing its built-in motion sensor and Scratch extension.
This combination not only introduces children to coding concepts but also adds a physical, interactive element to their learning experience.
Physical Computing: Interactivity, Integration, and Education
Physical computing involves using computers and other digital devices to interact with the physical world. It encompasses creating systems that can sense and respond to the environment through various inputs (like sensors) and outputs (like lights, motors, and displays). This approach brings abstract coding concepts into tangible, real-world applications, making understanding how software and hardware can work together easier.
What is Physical Computing?
- Interactivity: Physical computing emphasizes creating interactive systems that can respond to user inputs or environmental
- Integration: It involves the integration of software (code) with hardware components (sensors, actuators).
- Education: It’s a powerful educational tool that helps students grasp complex computing concepts through hands-on
What is Micro:bit?
The micro:bit is a compact, programmable computer designed to make learning to code easy and fun for kids. Created by the BBC, it is loaded with features that allow children to dive into the world of technology.
Some of its key components include:
- 25 LEDs arranged in a 5×5
- Two programmable
- Motion sensors: accelerometer and
- Bluetooth
- Input/output rings for connecting to other
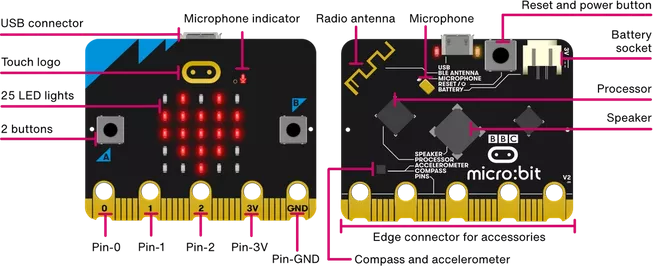
Image source – https://microbit.org/get-started/features/overview/
Different Sensors on Micro:bit
The micro:bit is equipped with several sensors that provide various functionalities:
- Accelerometer: Detects the orientation and movement of the
- Magnetometer: Acts as a
- Temperature Sensor: Measures ambient
- Light Sensor: Measures light levels using the LED’s
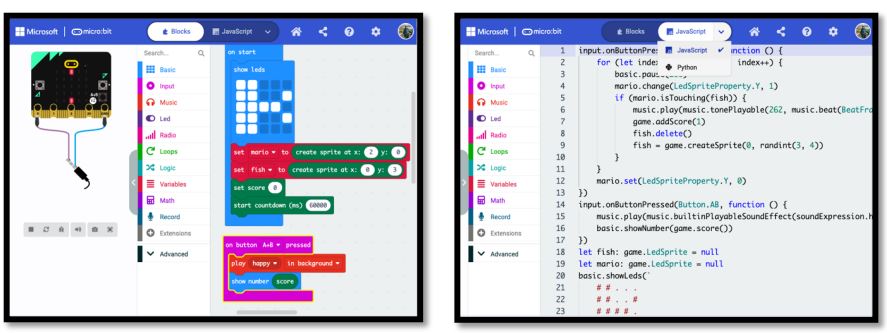
Programming Environments
Microbit supports various programming languages and environments suitable for different skill levels:
- Block-Based Coding: Platforms like MakeCode allow young learners to drag and drop blocks to create code, which is highly
- Text-Based Coding: For more advanced students, Microbit supports Python and JavaScript, enabling deeper exploration into coding.
How Micro:bit Helps Children Understand Physical Computing
Physical computing involves creating interactive systems that can sense and respond to the physical world. The micro:bit is an excellent introduction to this concept, as it bridges the gap between the digital and physical realms. Here’s how it helps:
- Hands-On Learning: Children learn by doing, which is a powerful educational approach. The micro:bit allows them to build, code, and see the immediate results of their
- Understanding Sensors and Actuators: The micro:bit is equipped with sensors (accelerometer, compass, temperature) and actuators (LEDs, buttons), which introduce children to the fundamental components of physical
- Developing Problem-Solving Skills: Programming the micro:bit to perform specific tasks requires logical thinking and problem-solving. Children learn to debug and refine their code, enhancing their analytical
- Encouraging Creativity: The open-ended nature of the micro:bit projects encourages children to be creative. They can invent new games, gadgets, and solutions, fostering an innovative mindset.
- Collaborative Learning: Working on micro:bit projects often involves Children learn to collaborate, share ideas, and learn from each other.
- Making Abstract Concepts Concrete: Concepts like loops, variables, and conditionals become tangible when children see them in action. For example, programming a micro:bit to blink an LED helps solidify the understanding of loops.
Uses of Micro:bit
The versatility of the micro:bit allows it to be used in numerous creative projects and educational activities. Here are some popular uses:
- Interactive Games: Children can create their own games, using the micro:bit as a controller. The built-in accelerometer can detect tilts and shakes, adding an extra layer of interactivity.
Example: A maze game where tilting the micro:bit moves a character through a maze displayed on the LEDs.
- Educational Tools: The micro:bit can be programmed to display text, numbers, and simple animations, making it a great tool for learning basic coding
Example: A digital dice that generates random numbers when shaken.
- Science Projects: With its sensors, the micro:bit can be used to collect data for science experiments.
Example: Using the temperature sensor to monitor and record temperature changes over time.
- Music and Art: Children can use the micro:bit to create digital art and
Example: A musical instrument where pressing buttons plays different notes.
- Robotics: The micro:bit can be integrated with motors and other components to build simple
Example: A micro:bit-controlled car that moves based on button presses or tilt directions.
Using the Motion Sensor
The accelerometer sensor on the BBC microbit is a versatile and essential component that allows the device to measure acceleration along three perpendicular axes: X, Y, and Z. This enables the microbit to detect motion and orientation changes, making it ideal for a wide range of applications in education, robotics, and interactive projects. Here’s a detailed look at how the accelerometer sensor works on the microbit and its features:
Overview of the Accelerometer Sensor
The accelerometer on the microbit is a Micro-Electro-Mechanical System (MEMS) device that can measure acceleration forces in three dimensions. These forces can be due to gravity, movement, or vibration. The sensor provides data that can be used to determine the orientation of the microbit, detect gestures, measure tilt, and even count steps.
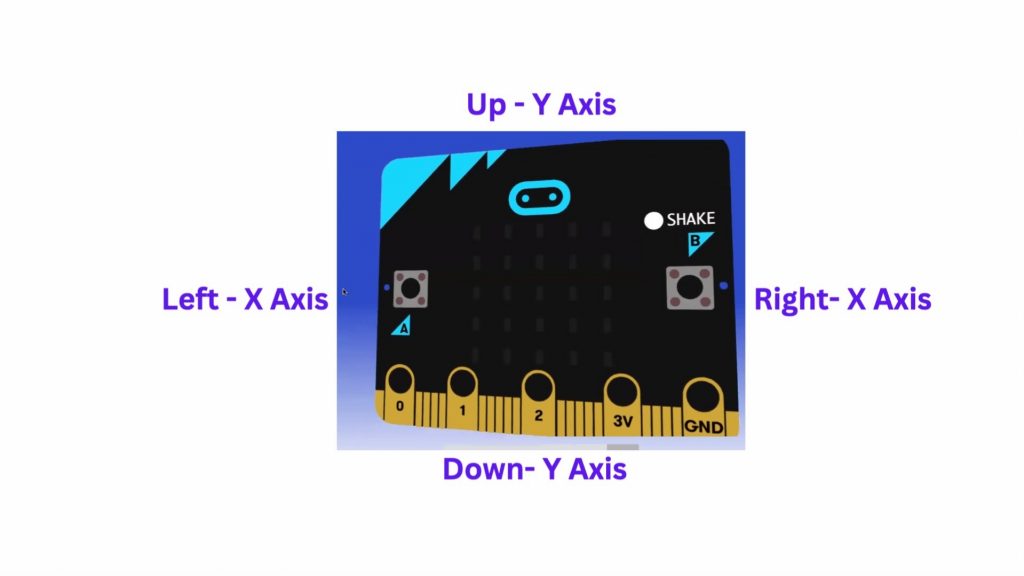
Axes of Measurement
- X-axis: Measures acceleration left and
- Y-axis: Measures acceleration forward and
- Z-axis: Measures acceleration up and
These measurements are typically provided in units of milli-g (mg), where 1g is the acceleration due to gravity (approximately 9.81 m/s²).
Key Features
- Three-Dimensional Measurement: The accelerometer can detect motion in all three spatial dimensions, which is crucial for understanding the orientation and movement of the
- Tilt Detection: By analysing the acceleration data, the microbit can determine its tilt along any of the three axes. This feature is commonly used in projects that require the microbit to respond to changes in
- Gesture Recognition: The accelerometer can recognize specific gestures like shaking, tilting, and free-fall. This is useful for interactive applications where the microbit responds to user
- Step Counting: By processing the acceleration data, the microbit can function as a pedometer, counting the number of steps
- Sensitivity: The accelerometer on the microbit is sensitive enough to detect subtle changes in motion and orientation, making it suitable for a variety of applications from simple educational experiments to more complex
Practical Applications
- Education: Teachers use the accelerometer to teach concepts related to physics and motion. Students can create projects that involve measuring and analysing
- Gaming: The microbit can be used as a game controller, with the accelerometer detecting tilt and motion to control game.
- Wearables: The microbit can be incorporated into wearable devices to monitor physical activity or respond to gestures.
- Robotics: In robotics, the accelerometer helps in navigation and stability control by providing feedback on the robot’s orientation and movements.
- Interactive Projects: Artists and makers use the accelerometer to create interactive installations that respond to movement and orientation changes.
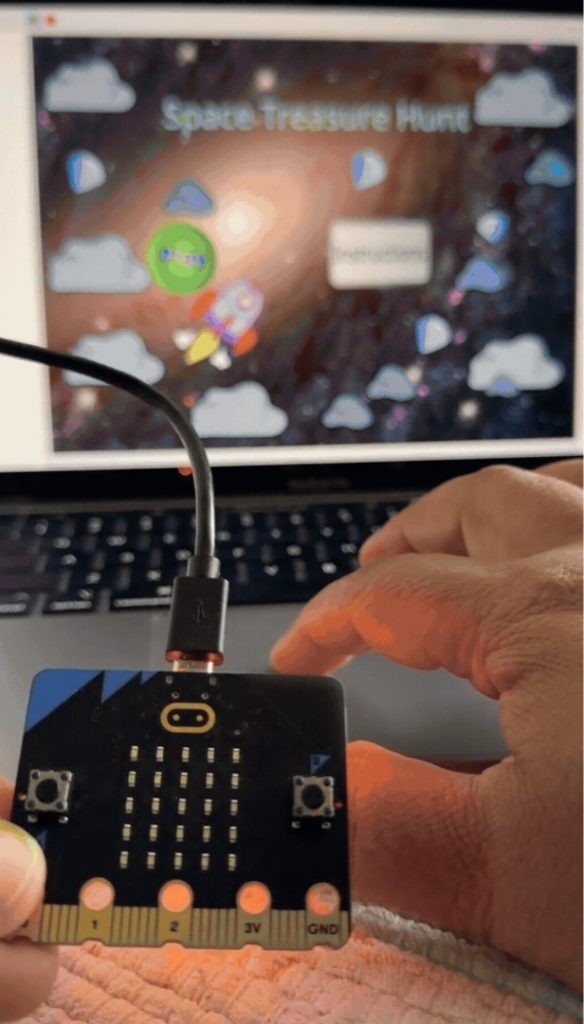
This makes it perfect for using as a game controller, where tilting the micro:bit can control game actions.
Bridging Physical Computing and Visual Programming
Both Microbit and Scratch are valuable tools in modern education for encouraging creativity, problem-solving, and technical skills. Microbit offers a tangible experience with hardware, making it great for hands-on projects, while Scratch provides a highly accessible introduction to coding through its visual interface and online community. Integrating both can
provide a comprehensive learning experience that leverages the strengths of each platform.
A Simple Three-Step Guide
Step 1: Create Your Game in Scratch
Step 2: Set Up Microbit Extension in Scratch Step 3: Use Microbit as a Game Controller
Step 3: Use Microbit as a Game Controller
Space Treasure Hunt Game with Microbit as Game Controller
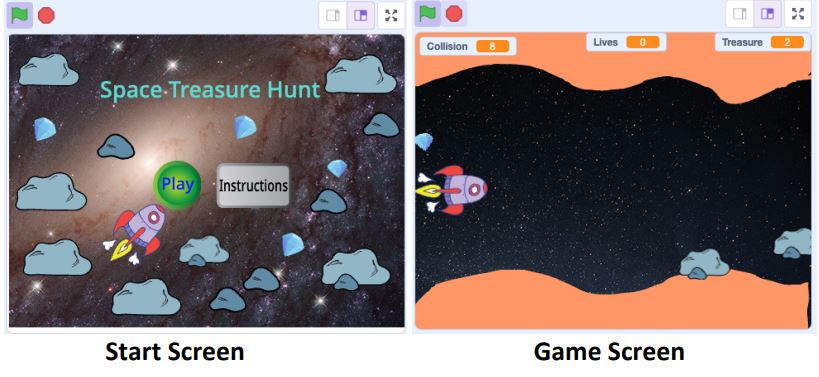
Game Design
1. Objective:
- Collect 20 jewels to win the
- Avoid collisions with
- Avoid touching the outer orange
2. Rules:
- Start with 5
- Lose a life when touching the outer
- Track collision count with
- Lose the game if collision count exceeds
3. Elements:
- Spacecraft: Controlled by the tilt
- Jewels: Collectible
- Meteoroids:
- Outer orange surface: Boundary of the game
Game Explanation
- Initialization: Sets up initial game variables and generates random positions for jewels and meteoroids.
- Movement: Uses Microbit to move the
- Collision Detection: Checks for collisions with jewels, meteoroids, and the
- Game Logic: Determines the winning or losing
This basic structure can be expanded with more features and optimizations for a better gaming experience.
Lets get started..
Step 1: Create Your Game in Scratch
- Open Scratch: Go to the Scratch website and click on “Create” to start a new project.
· 2. Design Your Game:
- Add Sprites: Click on the “Choose a Sprite” button to add characters and objects to your
- Create Backdrops: Design your game’s environment by clicking on the “Choose a Backdrop” button.
- Program Your Game: Use the block-based coding interface to define the behaviour of your sprites. For example, you can create a simple game where a character catches falling objects.
Step 2: Setting Up the Link Between Scratch and Micro:bit
To use the micro:bit with Scratch, follow these steps:
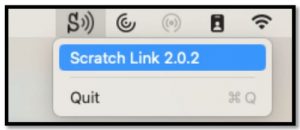
- Install Scratch Link: This application connects Scratch projects to the micro:bit. Download and install Scratch Link from the official Scratch website.
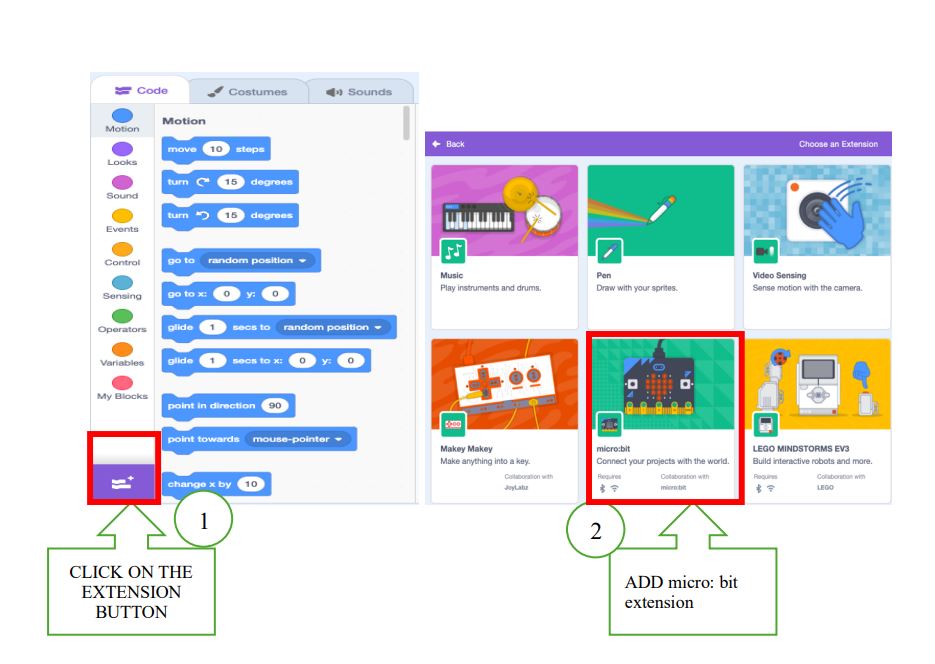
2. Add the Microbit Extension: In Scratch, click on the “Extensions” button at the bottom of the screen and select the micro:bit extension. This will add a set of blocks specifically for interacting with the micro:bit.
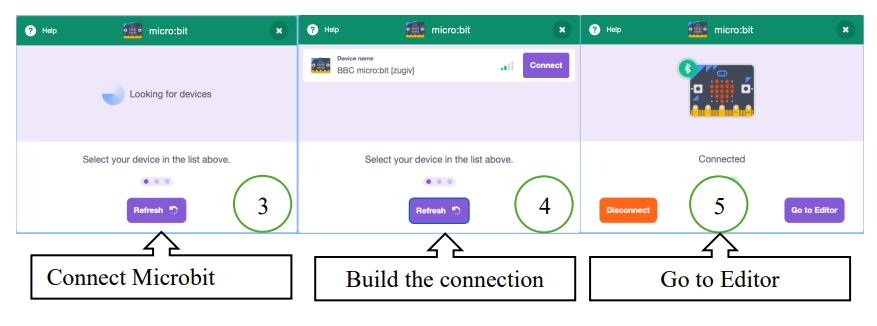
Step 3: Use Microbit as a Game Controller
With the micro:bit extension added, you will have access to new blocks in the “micro:bit” category. The Microbit extension in Scratch includes 10 blocks.
- 3 Action Blocks
- 4 Event Blocks
- 1 Information Block
- 2 Check Blocks
These blocks allow you to read data from the micro:bit’s sensors, control its LEDs, and use its buttons.
Here’s a simple breakdown:
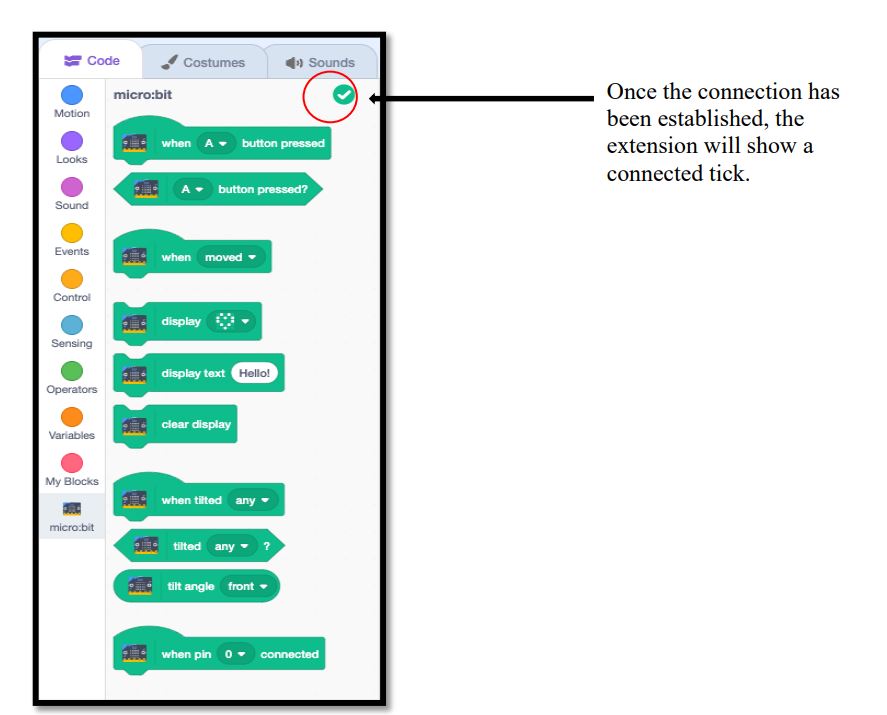
| Block | Explanation |
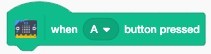 |
This block is used to run a code when a button on the micro:bit is pressed. |
| This is used to detect whether a button on the micro:bit is pressed or
not. |
|
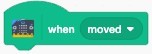 |
This runs a code when the micro:bit is moved, shaken or jumped. |
| This is used to display a pre-made icon on the micro:bit LED display. | |
| This is used to display some text on the micro:bit LED display. | |
 |
This clears the LED display. |
 |
This runs a code when the micro:bit is tilted by a certain amount. |
| This detects whether the micro:bit is tilted by an amount. | |
|
This reports the angle that the micro:bit is tilted at. |
|
 |
This starts a code when a pin on the micro:bit is connected to a device. |
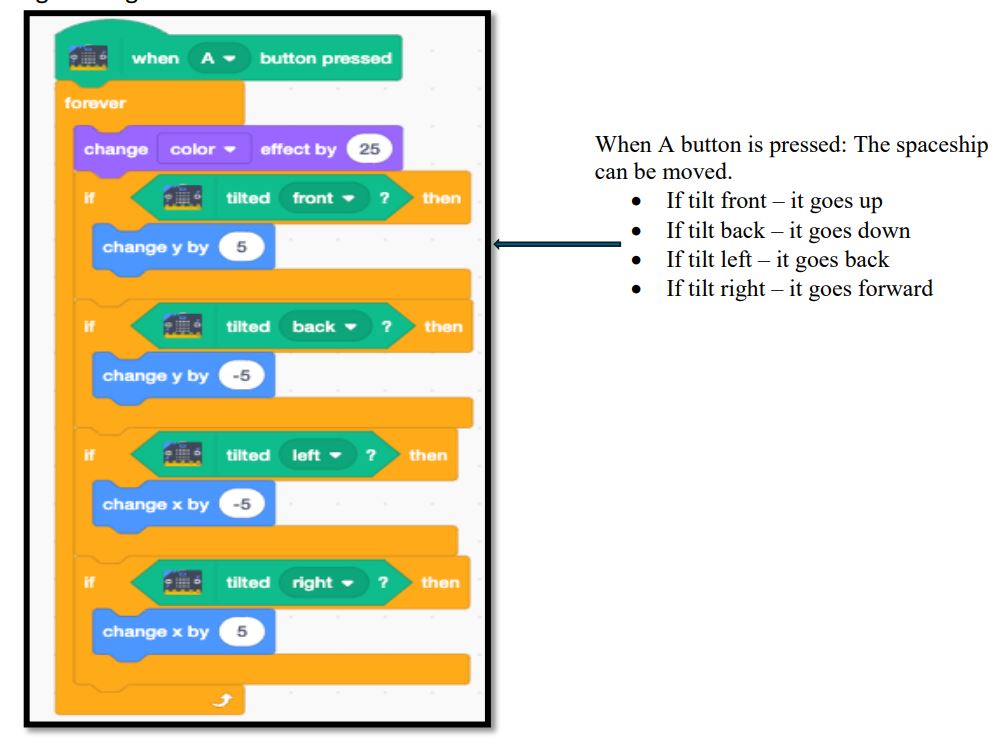
Here’s a simple snippet on how to control a spaceship using Micro
blocks. This example assumes that you want to move the spaceship left and right using the Micro:bit’s accelerometer:
Explore SkoolOfCode’s Exciting Microbit Modules
At SkoolOfcode, we ignite young minds with the power of technology and creativity. Our specialized Microbit modules offer hands-on, engaging learning experiences. Discover two of our most popular modules:
1. IoT/Robotics with Micro:bit: Bringing Imagination to Life
This module lets students create interactive projects using Microbit’s sensors. From making animations and games to building simple robots, kids will learn to code while exploring real-world applications.
Key Highlights:
- Create images, animations, and
- Utilize built-in sensors like accelerometers and temperature
- Undertake projects that blend coding with physical
- Introduction to the Internet of Things (IoT).
2. Advanced Micro:bit: Diving Deep into Electronics
Perfect for those ready to advance their skills, this module focuses on electronics and circuit design. Students will learn to interface Microbit with various components, write complex programs, and build real-world electronic projects.
Key Highlights:
- Interface with LEDs, buzzers, and
- Learn circuit design using breadboards and
- Advanced coding with Python and
- Real-world projects like home automation and security
Conclusion
Using the Microbit as a game controller with its built-in motion sensor and Scratch extension is a fantastic way to introduce children to coding in a fun and interactive manner. This approach not only teaches essential coding concepts but also enhances problem-solving skills, creativity, and teamwork. By engaging in hands-on projects, children can see the immediate results of their work, making abstract concepts concrete and fostering a deeper understanding of physical computing.
At SkoolOfCode, we are dedicated to providing exceptional coding classes for kids, empowering them with the skills needed in today’s digital world. Our specialized Microbit modules offer exciting opportunities for young learners to explore the realms of physical computing, robotics, and programming.
Ready to Get Started?
Unleash your child’s potential with SkoolOfCode. Book a free trial class today and watch their creativity and technical skills soar. Join us now and give your child the head start they deserve in the world of technology and coding.
Ms.Manpreet Virk, an educator at SkoolOfCode with a degree in M.Phil and Master in Computer Science. She is passionate about learning and teaching young minds.