
Imagine being in a charming café in Paris, trying to order a croissant but stumbling over your limited French. Or picture yourself lost in the bustling streets of Tokyo, with every sign and conversation around you a mystery. Language barriers are a common hurdle in our globalized world, but what if breaking them was as easy as tapping a button on your smartphone?
Welcome to the world of custom app creation, where your solution is at your fingertips – quite literally. In this blog, we’re diving into the exciting journey of building your translator app, a tool that can make the world a little smaller and a lot more accessible. And the best part? You don’t need to be a tech wizard to make this happen. With MIT App Inventor, a revolutionary platform that simplifies app development, anyone with a spark of creativity and determination can bring their app ideas to life, making it a perfect introduction to computer programming for kids.
MIT App Inventor demystifies the app-building process, making it accessible and fun. Whether you’re a student, a hobbyist, or someone just curious about app development, this platform is your playground. By the end of this blog, you’ll not only understand the nuts and bolts of using MIT App Inventor but also have a blueprint for creating an app that bridges languages – your very own translator app, customized to your needs and preferences. This type of project exemplifies the potential of block coding for kids, as it introduces them to programming concepts engagingly and tangibly.
So, let’s embark on this journey from concept to creation, turning your vision into a tangible, functional app. Ready to be the architect of your digital translator? Let’s get started!
If your child enjoys turning ideas into working apps, SkoolOfCode runs live online coding classes for kids that cover MIT App Inventor along with block coding, Python, and game design. Each class is small, project-based, and taught by a mentor, so kids build real apps while they learn.
What is MIT App Inventor?
MIT App Inventor is a visual programming environment that allows individuals with little to no programming experience to create mobile applications for Android devices. It was developed by Google and later handed over to the Massachusetts Institute of Technology (MIT). The primary goal of MIT App Inventor is to make app development accessible to a wide range of people, including educators, students, hobbyists, and those who may not have a strong background in traditional coding languages. Key features of MIT App Inventor include:
- Visual Programming: Instead of writing code, users design the behavior of their app using a graphical interface. This is done by dragging and dropping visual components and connecting them with blocks that represent various programming functions.
- Real-Time Testing: MIT App Inventor provides a live testing feature, allowing users to see the impact of their changes instantly on an Android device or emulator.
- Extensive Component Library: The platform offers a wide variety of components that can be added to an app, such as buttons, textboxes, sensors, and multimedia elements.
- Integration with External Services: MIT App Inventor supports integration with external services and APIs, allowing users to add functionalities like Google Maps, Firebase, and more.
- Educational Focus: MIT App Inventor is often used in educational settings to introduce students to the basics of programming and app development in a user-friendly environment.
- Open Source: The MIT App Inventor source code is open source, encouraging collaboration and community contributions. Whether you’re a beginner exploring app development for the first time or an educator introducing programming concepts to students, MIT App Inventor provides a hands-on and accessible way to create Android applications.
From Blueprint to Brilliance: Navigating the Three Key Stages
Building an app is like putting together a puzzle in three main steps: designing, coding, and testing. First, you plan out what your app will do and how it will look. Then, you turn that plan into the actual code that makes the app work. Finally, you check and test everything to make sure it runs smoothly. It’s like making sure all the puzzle pieces fit perfectly before showing your finished picture to everyone. These steps, design, code, and test, work together to make sure your app is useful and works well for its users. Let’s explore each of these stages in more detail:
Stage 1 – Design:
- Conceptualization: In this phase, you define the purpose and goals of your application. What problem does it solve? Who is your target audience? What features will it include?
- User Interface (UI) Design: Create wireframes or prototypes to visualize the layout and flow of your app. Consider user experience (UX) and design principles to make the interface intuitive and user-friendly.
- Architecture Planning: Outline the overall structure of your app, including the database schema, backend services, and any third-party integrations. This phase is crucial for ensuring a scalable and efficient application.
Stage 2- Code:
- Implementation: Write the actual code for your application based on the design and architectural plans. Use programming languages, frameworks, and tools that align with your project requirements.
- Frontend and Backend Development: Depending on the complexity of your app, you may need to develop both the frontend (user interface) and backend (server-side logic, databases, etc.). Frontend development focuses on what users interact with, while backend development handles server-side processes.
- Integration: Incorporate any necessary APIs, libraries, or external services. Ensure that different components of your app work seamlessly together.
Stage 3- Test:
- Unit Testing: Verify individual components of your code to ensure they work as intended. Unit tests help catch errors early in the development process.
- Integration Testing: Test how different modules or components of your app work together. Ensure that data flows correctly between frontend and backend components.
- User Acceptance Testing (UAT): Involve real users or stakeholders to evaluate the app’s functionality, usability, and overall performance. Gather feedback to make necessary improvements.
- Quality Assurance (QA): Conduct thorough testing to identify and fix bugs, security vulnerabilities, and performance issues. Aim for a stable and reliable application.
These stages are iterative, meaning that you may cycle through them multiple times to refine your app based on feedback and testing results. After successful testing, your application is ready for deployment to production, making it available to users.
Remember that effective collaboration and communication between design, development, and testing teams are crucial for the successful completion of each stage in the app development process.
Let’s get started
Following the steps below is easier when a mentor is on the call to debug along with your child. If you want to see how that works, you can book a free trial class at SkoolOfCode and watch your child build a small app from scratch in one session.
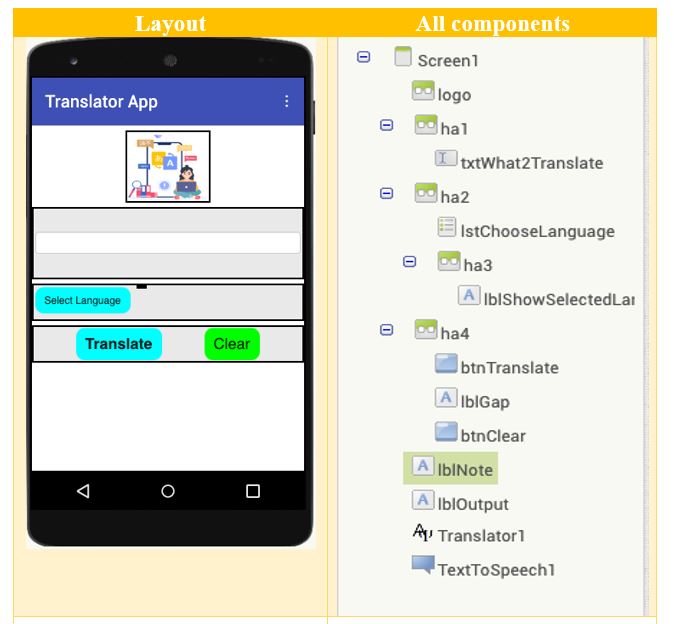
Components in detail :
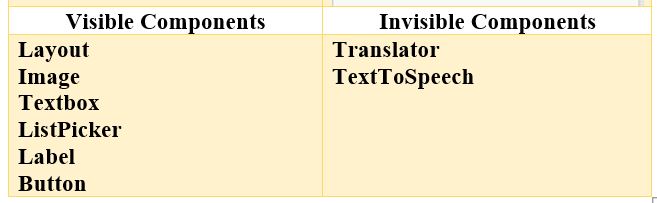
In MIT App Inventor, components can be either visible or invisible based on your app’s requirements. Here’s an overview of visible and invisible components:
- Visible components are displayed on the screen and can be seen by the user. You use visible components to present information, receive input, or interact with the user.
- Invisible components in MIT App Inventor operate behind the scenes and are not directly visible on the UI screen. Despite their hidden nature, these components offer developers access to a range of built-in functions, enabling the integration of diverse features such as motion sensing, audio manipulation, language translation, speech synthesis, and timekeeping within the application.
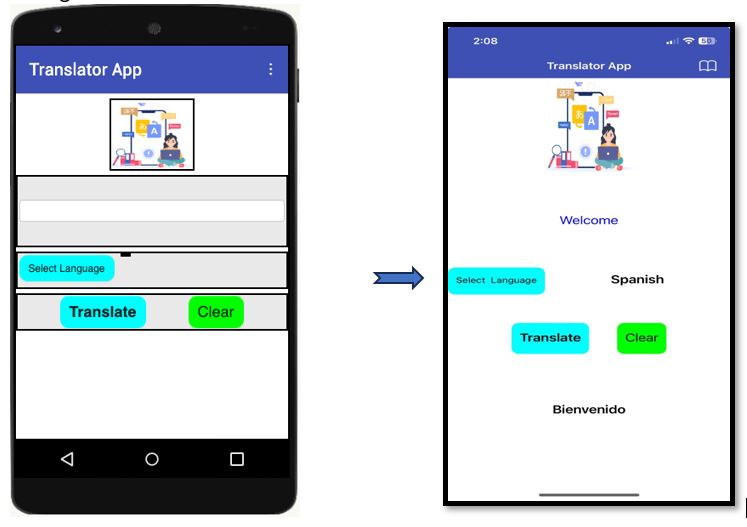
Step 1- Conceptualization
Designing a translator app involves several steps, and the algorithm can be outlined as follows. I’ll provide a high-level description of the steps involved:
Algorithm for a Translator App:
- User Input: The app should provide a text input field for the user to enter the text they want to translate.
- Language Selection: Display a list of available languages for translation. Allow the user to choose the desired target language from the list.
- Translate Button: Implement a “Translate” button that the user can click after entering text and selecting the target language.
- Clear Button: Add a “Clear” button to reset the input text and language selection.
- Language Translation API: Utilize a language translation API to perform the actual translation. There are several APIs available (e.g., Google Translate API, Microsoft Translator API).
- TextToSpeech: Speak the translated text aloud.
Step 2- User Interface(UI) Design
- Layout – Horizontal Arrangements: Using a Horizontal Arrangement is helpful when you want to create a row of elements that should be displayed horizontally on the screen. It provides a convenient way to organize and structure the user interface of your app.
- User Interface(UI) components are the building blocks that allow you to create the visual and interactive aspects of your mobile application. These components are available in the App Inventor Palette, and you can drag and drop them onto the Viewer to design the layout of your app.
- Button: A clickable element that users can interact with to trigger actions or functions within your app.
- TextBox: An input field where users can enter text. TextBox components are used to collect textual input from users.
- Label: A non-editable text element that is used to display information or provide instructions to the user. Labels are often used for static text.
- ListPicker: The ListPicker is a UI component that allows users to select an item from a list of options. It provides a drop-down menu displaying a list of choices, and users can choose one option from that list. The ListPicker component is commonly used when you want users to select from a predefined set of options. Use the property ElementsFromString to set the list of choices from a string of comma-separated values.
For example : for the list of languages to be selected – German,Polish,Russian,Greek,Thai,Italian,Spanish,Chinese,French,Korean,Hindi,Swedish,Japanese
- Media: the Media components are a set of components that allow you to work with media files, such as audio and video, in your mobile applications.
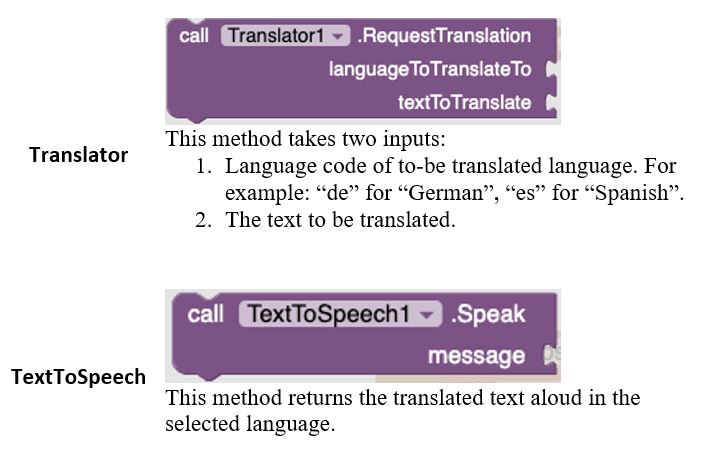
- TextToSpeech: The TextToSpeech component makes your app speak out text. You can control how it sounds by adjusting pitch and speech rate. You can also give it a language code, but it won’t change the language; it just alters the pronunciation, like speaking English with a French accent.
- Translator-This is a tool you can use in MIT App Inventor to change words and sentences from one language to another. The Translator needs to connect to the internet. It will send requests for translations to a server at MIT, which will then ask a commercial translation service for the actual translations. When you use the Translator, you tell it which language your text is in (source language) and which language you want it to be translated into (target language). You do this by specifying these languages using short two-letter codes.
Step 3: Coding
Building the backend of a translator app involves several programming concepts. Here are some key programming concepts that you’ll likely encounter while developing the backend of a translator app:
- Variable: Use variables to store and manage data, including the user input, translated text, and language settings.
- User Input Handling: Capture and process user input, such as the text to be translated and the selected target language.
- Data structure: Use of a dictionary, a data structure that stores key-value pairs. Each key must be unique within the dictionary, and you can use the key to quickly retrieve the corresponding value. Dictionaries are versatile and are used in various programming languages for different purposes.
- Event-driven programming: Event-driven programming in MIT App Inventor enables developers to create responsive apps that react to user interactions and external events without traditional text-based coding. For instance,
- “Button.Click” event, the associated event handler executes when the button is clicked, allowing developers to define specific actions in response.
- “ListPicker.AfterPicking”, the associated event handler executed when the value is picked from the list.
- “Translator.GotTranslation”, event is triggered when the translated service returns the translated text.
- Method: A set of instructions or a block of code that performs a specific task or operation. It is a way to organize code into reusable and modular units. Methods are also known as functions or procedures in various programming languages. In MIT App Inventor, both the Translator and TextToSpeech components have associated methods that you can use to control their behavior.
Get Set GO
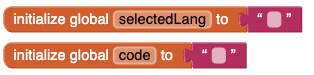
Step 1: Declare variables
- Define the global variable selectedLang and langcode. Assign an empty string to both variables.
2. Build a dictionary for selected languages that you would like to offer for translation in your app in the {key:value}format. I have picked 13 languages as per my preference but you can pick as many as you like from MIT App community.
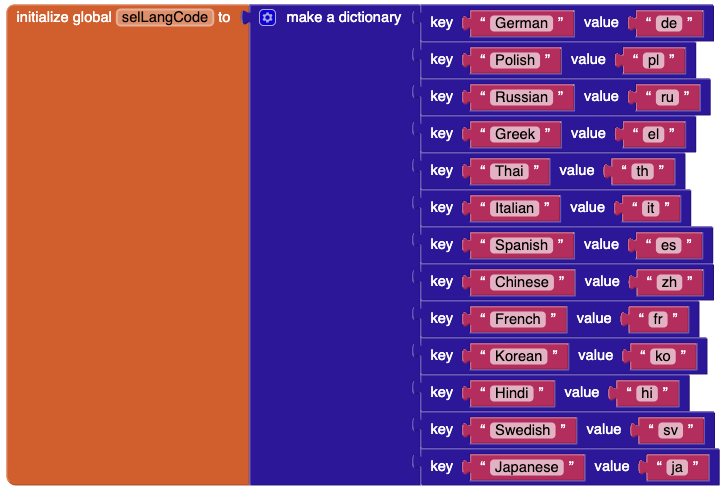
3.Assign the dictionary to another global variable selLangCode. This will provide the language code, after searching the language key provided by ListPicker.
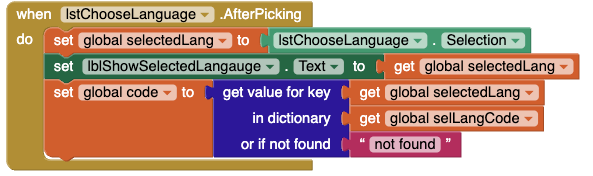
Step 2: Choose the translated language from the ListPicker
- Store the selection from ListPicker in “selectedLang” variable.
- Display the selected language in “ShowSelectedLanguage” label on the frontend.
- Get the associated language code from the dictionary and store it in “code” variable. In case the {key: value} is not found in the dictionary then display the message “not found “code
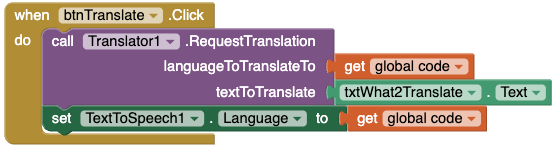
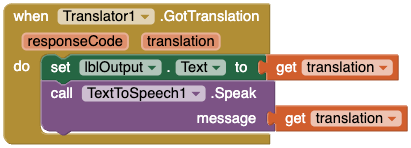
Step 3 : Final Output :display the user entered text in translated language and say aloud
On click of Translate button:
- Call method “Translator.RequestTranslation”
- Set the language of TextToSpeech to assigned “code”.
- Trigger a” Translator.GotTranslation “ event to return the translated test and use TextToSpeech component to say the translated text loud.
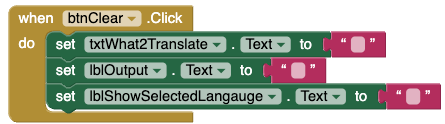
Step 4 : Clear all options to the original state.
Conclusion
As we wrap up our blog on building a translator app with MIT App Inventor, you’ve taken not just a leap into the world of app development, but also into the broader, exciting realm of online coding for kids. This experience is more than just about learning to code; it’s about breaking down barriers and bringing your ideas to life in the digital world.
For young minds eager to explore more such adventures in coding, SkoolOfCode offers an incredible opportunity. With a curriculum that includes block coding for kids and courses in MIT App Inventor, it’s the perfect platform to dive deeper into the world of app development and beyond. Our online coding classes for kids are designed to ignite curiosity and creativity, providing a nurturing environment for young learners to thrive.
Don’t let the learning stop here – book a trial at SkoolOfCode and embark on your next coding adventure, where creativity meets technology in our coding classes for kids online.
Remember, every great coder started somewhere, and today, you’ve taken that essential first step. Keep building, keep exploring, and who knows what amazing app you’ll create next.
Ms.Manpreet Virk, an educator at SkoolOfCode with a degree in M.Phil and Master in Computer Science. She is passionate about learning and teaching young minds.