Have you ever marveled at the speed of sound, how a simple snap can reach your friend’s ear almost instantaneously? Surprisingly, this speed can vary, and we’re about to explore why, leaving behind the mundane for an adventure with Arduino, our technological ally. Prepare to construct a sonic boom machine and delve into sound waves, embracing a hands-on learning experience that’s far from the ordinary.
Arduino, often mistaken as a tool solely for tech aficionados, simplifies scientific exploration, transforming complex concepts into engaging, plug-and-play projects. Using an ultrasonic sensor, akin to a bat’s echolocation, we’ll navigate through the nuances of sound waves, offering a dynamic learning experience that breathes life into those once-static science diagrams.
This journey invites you to witness the science of sound in a tangible form, making each learning moment memorable. Ready to unlock the mysteries of sound speed with a beep, beep, boom? Dive in with us.
The Science Behind the Beep: It’s More Than Just Noise!
Before we reveal our sonic boom machine, let’s peek under the hood of sound waves. Imagine invisible ripples traveling through the air, bumping into your eardrums, and creating that familiar “beep.” The faster these ripples move, the higher the pitch you hear. Cool, right?
But how fast exactly are these ripples? Scientists call that speed “sound speed,” and it depends on a surprising factor: temperature. Warmer air acts like a highway for sound, making it travel faster than in chilly conditions. Now, imagine an amazing tool called an ultrasonic sensor. It’s like a tiny bat, sending out inaudible high-frequency sound waves and listening for their echo bouncing back. By measuring how long it takes for the echo to return, we can figure out the distance the sound wave traveled.
But here’s the magic: since we know the time and the distance, we can use a nifty formula to calculate the speed of sound! It’s like cracking a science code with the help of our ultrasonic sensor. Pretty cool, huh? So, are you ready to be a mini sound detective and unveil the secrets of speed with your very own sonic boom machine?
Building Your Sonic Boom Machine: Get Ready to Beep, Beep, Boom!
Time to turn theory into practice with the Skoolofcode Arduino curriculum! We’re about to build our very own sonic boom machine and witness the magic of sound speed firsthand. Don’t worry, you won’t need a fancy lab – just gather these superhero science tools:
- Arduino: Our trusty tech mastermind!
- Ultrasonic sensor: Our distance detector.
- Jumper wires: Tiny electrical highways for connecting everything.
- Breadboard: A temporary home for our electronic circuit.
- Computer: Where the Arduino code comes to life.
- (Optional) External battery pack: Give your sonic boom machine extra power!
Now, let’s connect the dots:
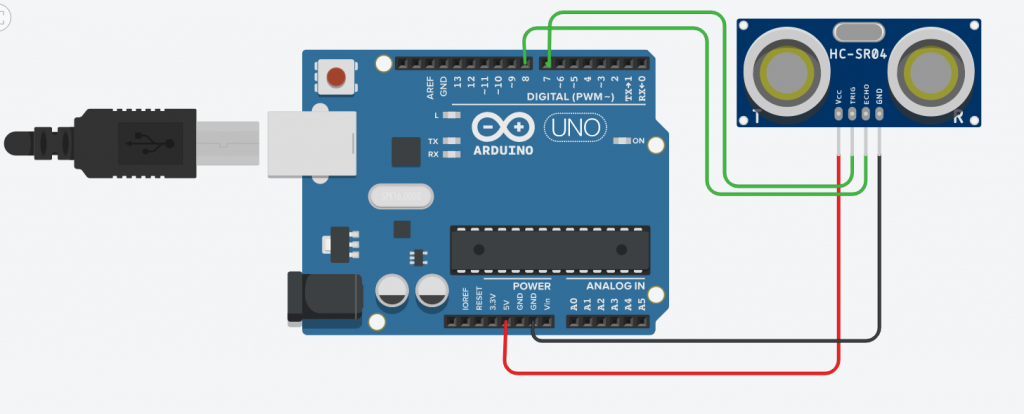
- Pin Power: Plug the Arduino’s 5V and GND pins to the breadboard’s power rails.
- Sensor Signals: Connect the ultrasonic sensor’s VCC and GND pins to the matching power rails. Its Trigger and Echo pins will go to specific Arduino digital pins (check your code!).
- Code Crusader: Upload the provided Arduino code onto your board. It’s like giving your machine instructions to measure and calculate sound speed.
- Beep Test: Power on your machine and see if the sensor lights up. If not, double-check the connections and code.
Building hiccups? Don’t worry, even superheroes face challenges! Here are some troubleshooting tips:
- Connection Chaos: Double-check all wire connections are secure and in the right spots.
- Code Calamity: Did you upload the correct code and select the right digital pins?
- Sensor Blues: Is the sensor powered on and functioning properly?
Remember, mistakes are part of the learning process. By troubleshooting, you’re becoming a true science detective! Now, with your sonic boom machine ready, prepare to be amazed by the speed of sound!
Demystifying the Tiny Bat Ears: Unveiling the Ultrasonic Sensor’s Superpowers
Imagine having your own miniaturized bat echolocation system! That’s the magic of an ultrasonic sensor, and it’s the heart of our sonic boom machine. But before moving to our sound-speed detective, let’s peek inside its fascinating world:
The Power of Pins: Just like tiny doorways, the sensor has four crucial pins:
- VCC: This is the energy source, like the fuel keeping the sensor alive. Just like your phone needs a battery, the VCC pin connects to 5 volts of power.
- GND: This stands for “ground,” and it’s like the electrical earth. Think of it as the zero point for all the electricity flowing through the sensor.
- Trigger: This pin is the trigger-happy one! Sending a short burst of electricity here is like saying, “Go, little sound wave, explore the world and come back!”
- Echo: This pin acts like the sensor’s ears. It listens for the returning sound wave and tells the Arduino how long it took to travel, revealing the distance.
Ultrasonic Secrets: Now, the cool part! The sensor emits high-frequency sound waves (inaudible to humans, so don’t worry about bat-like shrieks!). These waves bounce off objects like echoes you hear in a cave. By measuring the time it takes for the echo to return, the sensor figures out how far the object is. It’s like a tiny sonic ruler!
Connecting the Dots: Remember our goal? Measuring sound speed! We use the sensor’s distance-measuring ability to track sound waves traveling through the air. By knowing the distance and the time it takes to travel, we can use a simple formula to unlock the mystery of sound speed. Pretty neat, right?
So, with these tiny pins and ultrasonic superpowers, the sensor becomes our key to understanding the invisible world of sound waves. Get ready to be amazed by the science hidden within this miniature marvel!
Distance= Speed * Time (i)
In Equation, we will fix the distance by placing the object at a specific distance and the time can be calculated by using the pulseIn function of Arduino IDE. As time and distance are known the speed can be calculated. This speed will be the speed of sound.
Arduino Code used for the calculation of the speed of sound
The pulseIn function provides the time in microseconds. The speed of sound thus comes in inches per microsecond. It is then converted to miles per hour.
int triggerPin = 7;
int echoPin = 8;
float duration;
long distance = 6;
float speedofsound;
void setup() {
pinMode (triggerPin,OUTPUT);
pinMode (echoPin, INPUT);
Serial.begin (9600);
}
void loop() {
digitalWrite (triggerPin, LOW);
delayMicroseconds (2);
digitalWrite (triggerPin, HIGH);
delayMicroseconds (10);
digitalWrite (triggerPin, LOW);
duration = pulseIn (echoPin, HIGH);
speedofsound= 2*distance/duration;// speed in inches/microseconds
speedofsound= (speedofsound/63360)*3600*1000000;// speed ofsound in miles per hour
Serial.println (speedofsound);
delay(3000);}
The speed of sound is 767 miles per hour and the same is verified by the serial monitor display.
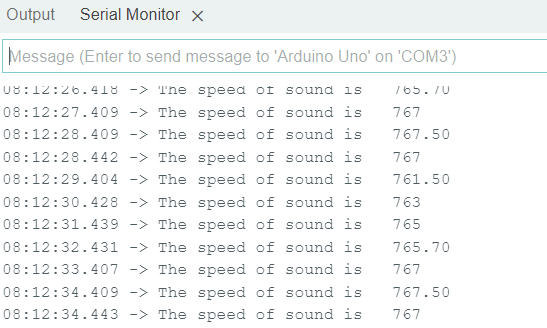
Output on Serial Monitor
Beep, Beep, Boom! Collecting Data: Unleashing the Sonic Boom
Alright, science detectives, it’s time to put your sonic boom machine to the test! Today, we’ll embark on a data-gathering mission to unveil the secrets of sound speed.
Data Analysis: Crack the Code!
Now comes the exciting part: transforming beeps into data. Use the recorded distances and the formula used in code to calculate the sound speed for each measurement.
Compare & Contrast: Unveiling the Mystery
So, you’ve got your sound speed results! How do they compare to the theoretical value for sound speed in air at the measured temperature? Are they the same?
Here’s the twist: Often, there might be slight discrepancies. Don’t worry, it’s not a science fail! These differences can be caused by various factors like:
- Tiny measurement errors: Even small variations in distance measurement can affect the calculated speed.
- Environmental influences: Wind or humidity can slightly alter how sound travels.
- Sensor limitations: The sensor has its inherent accuracy level, which can contribute to slight variations.
Embrace the Exploration!
This is where science gets even more exciting! By comparing and analyzing your results, you’re not just collecting data; you’re uncovering the nuances of the real world. Discuss with your fellow scientists (or friends!) the possible reasons for any discrepancies and how they might affect the outcome.
Remember, science is all about curiosity, exploration, and learning from every step. So, don’t be afraid to experiment, analyze, and most importantly, have fun on your journey to become a master of sound speed!
Science Made Fun! The Power of Hands-On Learning: Beyond the Beep
Our sonic boom adventure doesn’t end here! We’ve just unlocked the gateway to a world of creative exploration with your trusty Arduino. The possibilities are endless!
Benefits of Hands-On Learning:
But why is getting our hands dirty with science so important? Here’s the secret:
- Deeper Understanding: By actively engaging with the experiment, you’re not just memorizing facts, you’re experiencing science firsthand. This leads to a deeper understanding and retention of the concepts, making them come alive!
- Problem-Solving Champions: Building your own machine and troubleshooting challenges along the way hones your problem-solving skills. You learn to think critically, analyze situations, and find creative solutions, skills valuable in science and beyond.
- Spark of Inspiration: Hands-on projects ignite a passion for learning and make science fun and engaging. You’ll find yourself curious to explore other scientific phenomena and discover the exciting world around you.
At SkoolOfCode, hands-on learning with Arduino is central to our mission of teaching coding and robotics to kids. By integrating Arduino into our curriculum, we provide a tangible and interactive way for students to apply coding concepts in real-world scenarios. This approach enhances understanding, fosters creativity, and builds problem-solving skills, making learning both fun and effective. Through projects that combine coding for kids, robotics for kids, and Arduino for beginners, we aim to inspire a new generation of innovators and thinkers.
Join the Science Revolution!
This is just the beginning of your scientific adventures! Explore the vast world of Arduino for beginners and Book a Free trial class to start your Arduino journey. From building robots and controlling lights to monitoring environmental factors, the possibilities are endless. Share your creations, inspire others, and remember, the most important ingredient in science is curiosity and a thirst for knowledge. So, keep exploring, keep questioning, and keep making science fun with online coding classes for kids.
By –Dr. Kadam Bhambari, an Educator at SkoolofCode with Ph.D. and MTech in Electronics. She is an expert in Microbit, Arduino, and Artificial intelligence.